The Mournshade Mines
Structure
Exposition
If the characters were defeated by the mummy
You awake to the smell of frankincense and myrrh in your nostrils, and a brilliant light in your face, forcing you to squint to get a look at your surroundings. You have been laid out in a tomb, atop closed sarcophagi, and the sun shining through the skylight illuminates the squinting faces of your companions as well. The light fades as the sun quickly moves past the hole in the ceiling that it has been shining through, but it still provides enough illumination for you to get a glimpse at your surroundings.
Rich tapestries line the walls, telling the story of a great battle between a mummy and a group of warriors. In the story, the mummy was victorious, and forced the erstwhile tomb raiders to complete a task for him before he would free them from his Mummy's Geas.
Characters will be able to discern that the "warriors" in the narrative tapestry are themselves, with a DC12 Intelligence (Investigation) check.
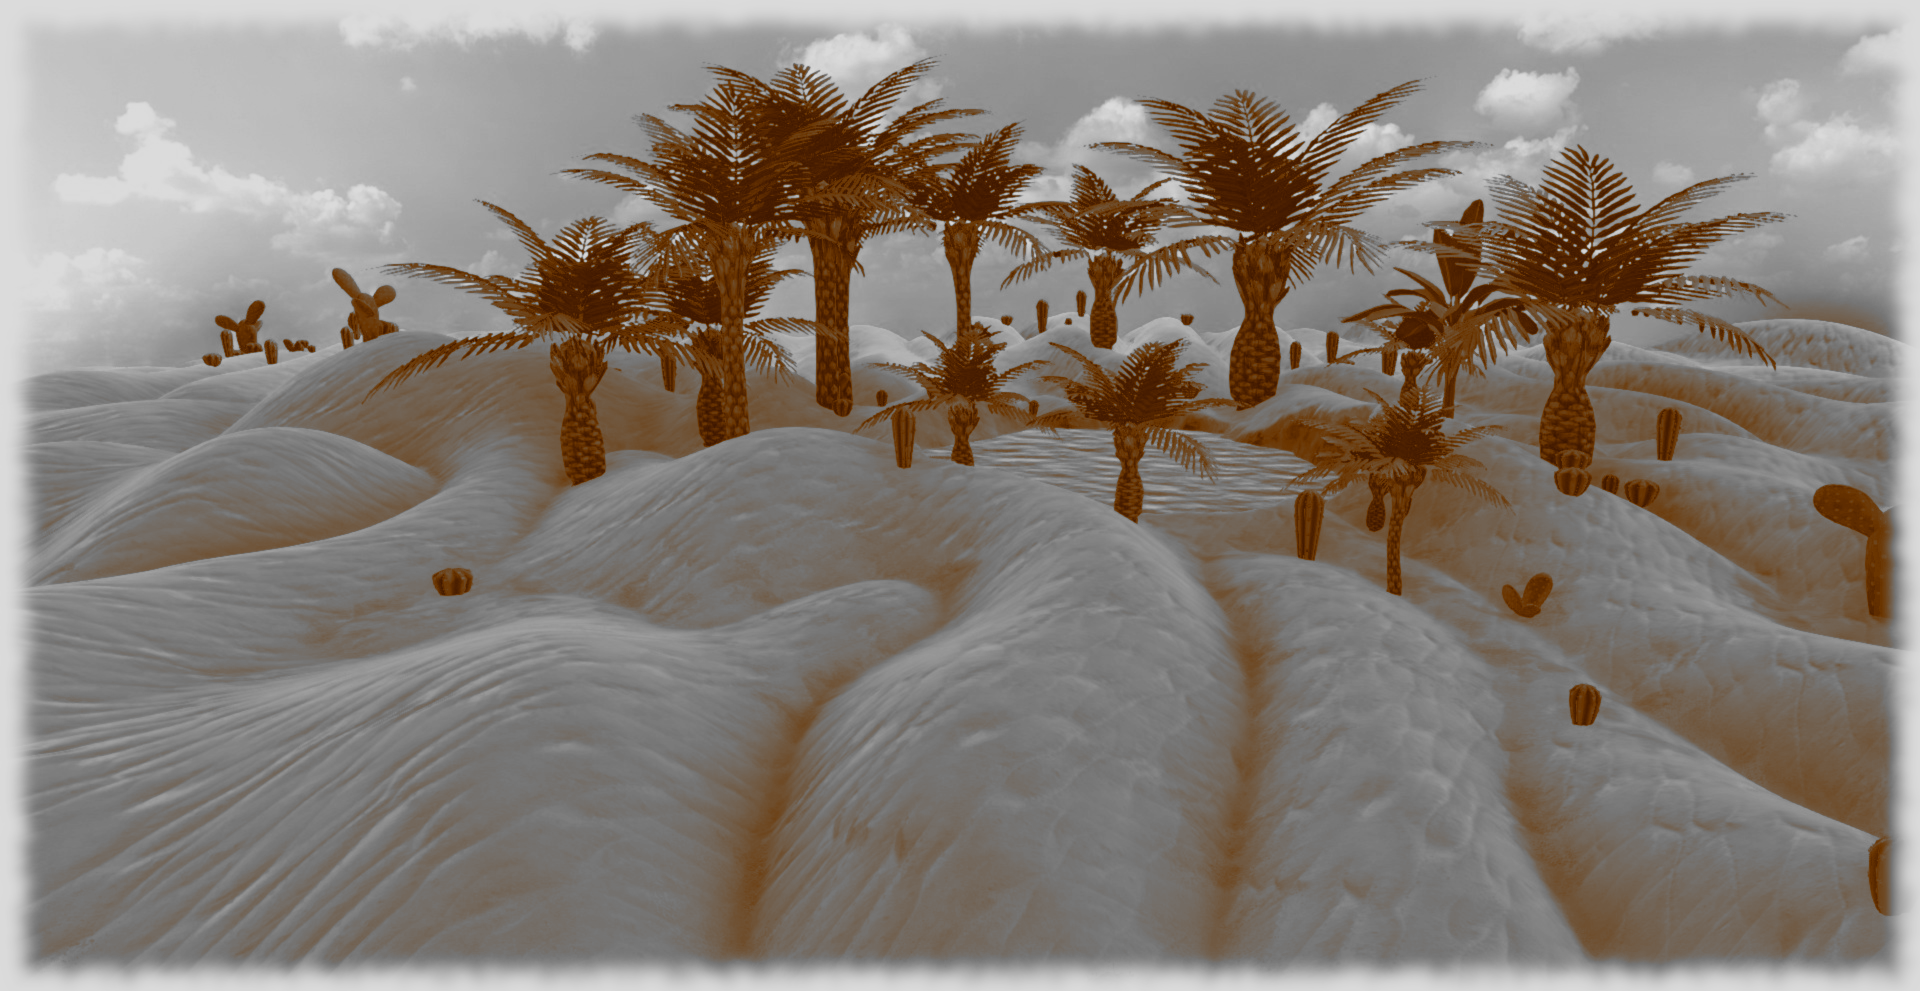
A sudden, unspoken command fills your mind. A force so powerful you cover your ears, even though you know you are not using them. "MOURNSHADE MINE" says a voice like grating rocks, blasting your mind with the words. Images come to you, then, of a serene desert tableau, replete with a tiny oasis and the surprising amount of vegetation that it supports. You can see every dew drop in the morning, feel every grain of wind-blown sand.
Then, your vision begins to fast forward. People come and find iron, they find gemstones and precious metals. Then, more people come, with machines and magic, and begin to take pieces of the ground away strip by strip. They uncover what they want, depositing the slag and waste material in the previous strip. The little oasis, with the trees and dewdrops, has been completely destroyed, and replaced by a vast hole that is rife with heavy salts and industrial waste material. A web of train tracks leads from the active edge of the mine to a huge processing plant. Zombies shuffle around the site, doing the heavy labor, while two human and a half-elf supervisors, wearing dark robes and carrying short staves, monitor the workers for productivity and output...
Your vision clears. It has only been a few moments, but you are disoriented for a full minute while your mind catches up to current events. You know what you have to do. You have to shut down the Mournshade Mine. You even know where the secret facility is, being able to feel it out in the desert, like a rash on your unconsciousness. The mere fact of the mine's existence leaves a bad taste in your mouth, like you took a sip of something burnt and oily. With a deep breath, you begin to plan your next move...
The characters will need supplies before they head off into the desert, and will need to make a detour to Heaton Bluffs in order to secure them.
If the characters get the quest from Boyce
It is a clear night several days after the events at Lerryn Sylphie's tomb, and the strong, cool wind blowing in from the sea has the waves breaking and the surfers out in force. There is a party tonight, and the smell of the food cooking all day has had everyone's stomachs grumbling for hours.
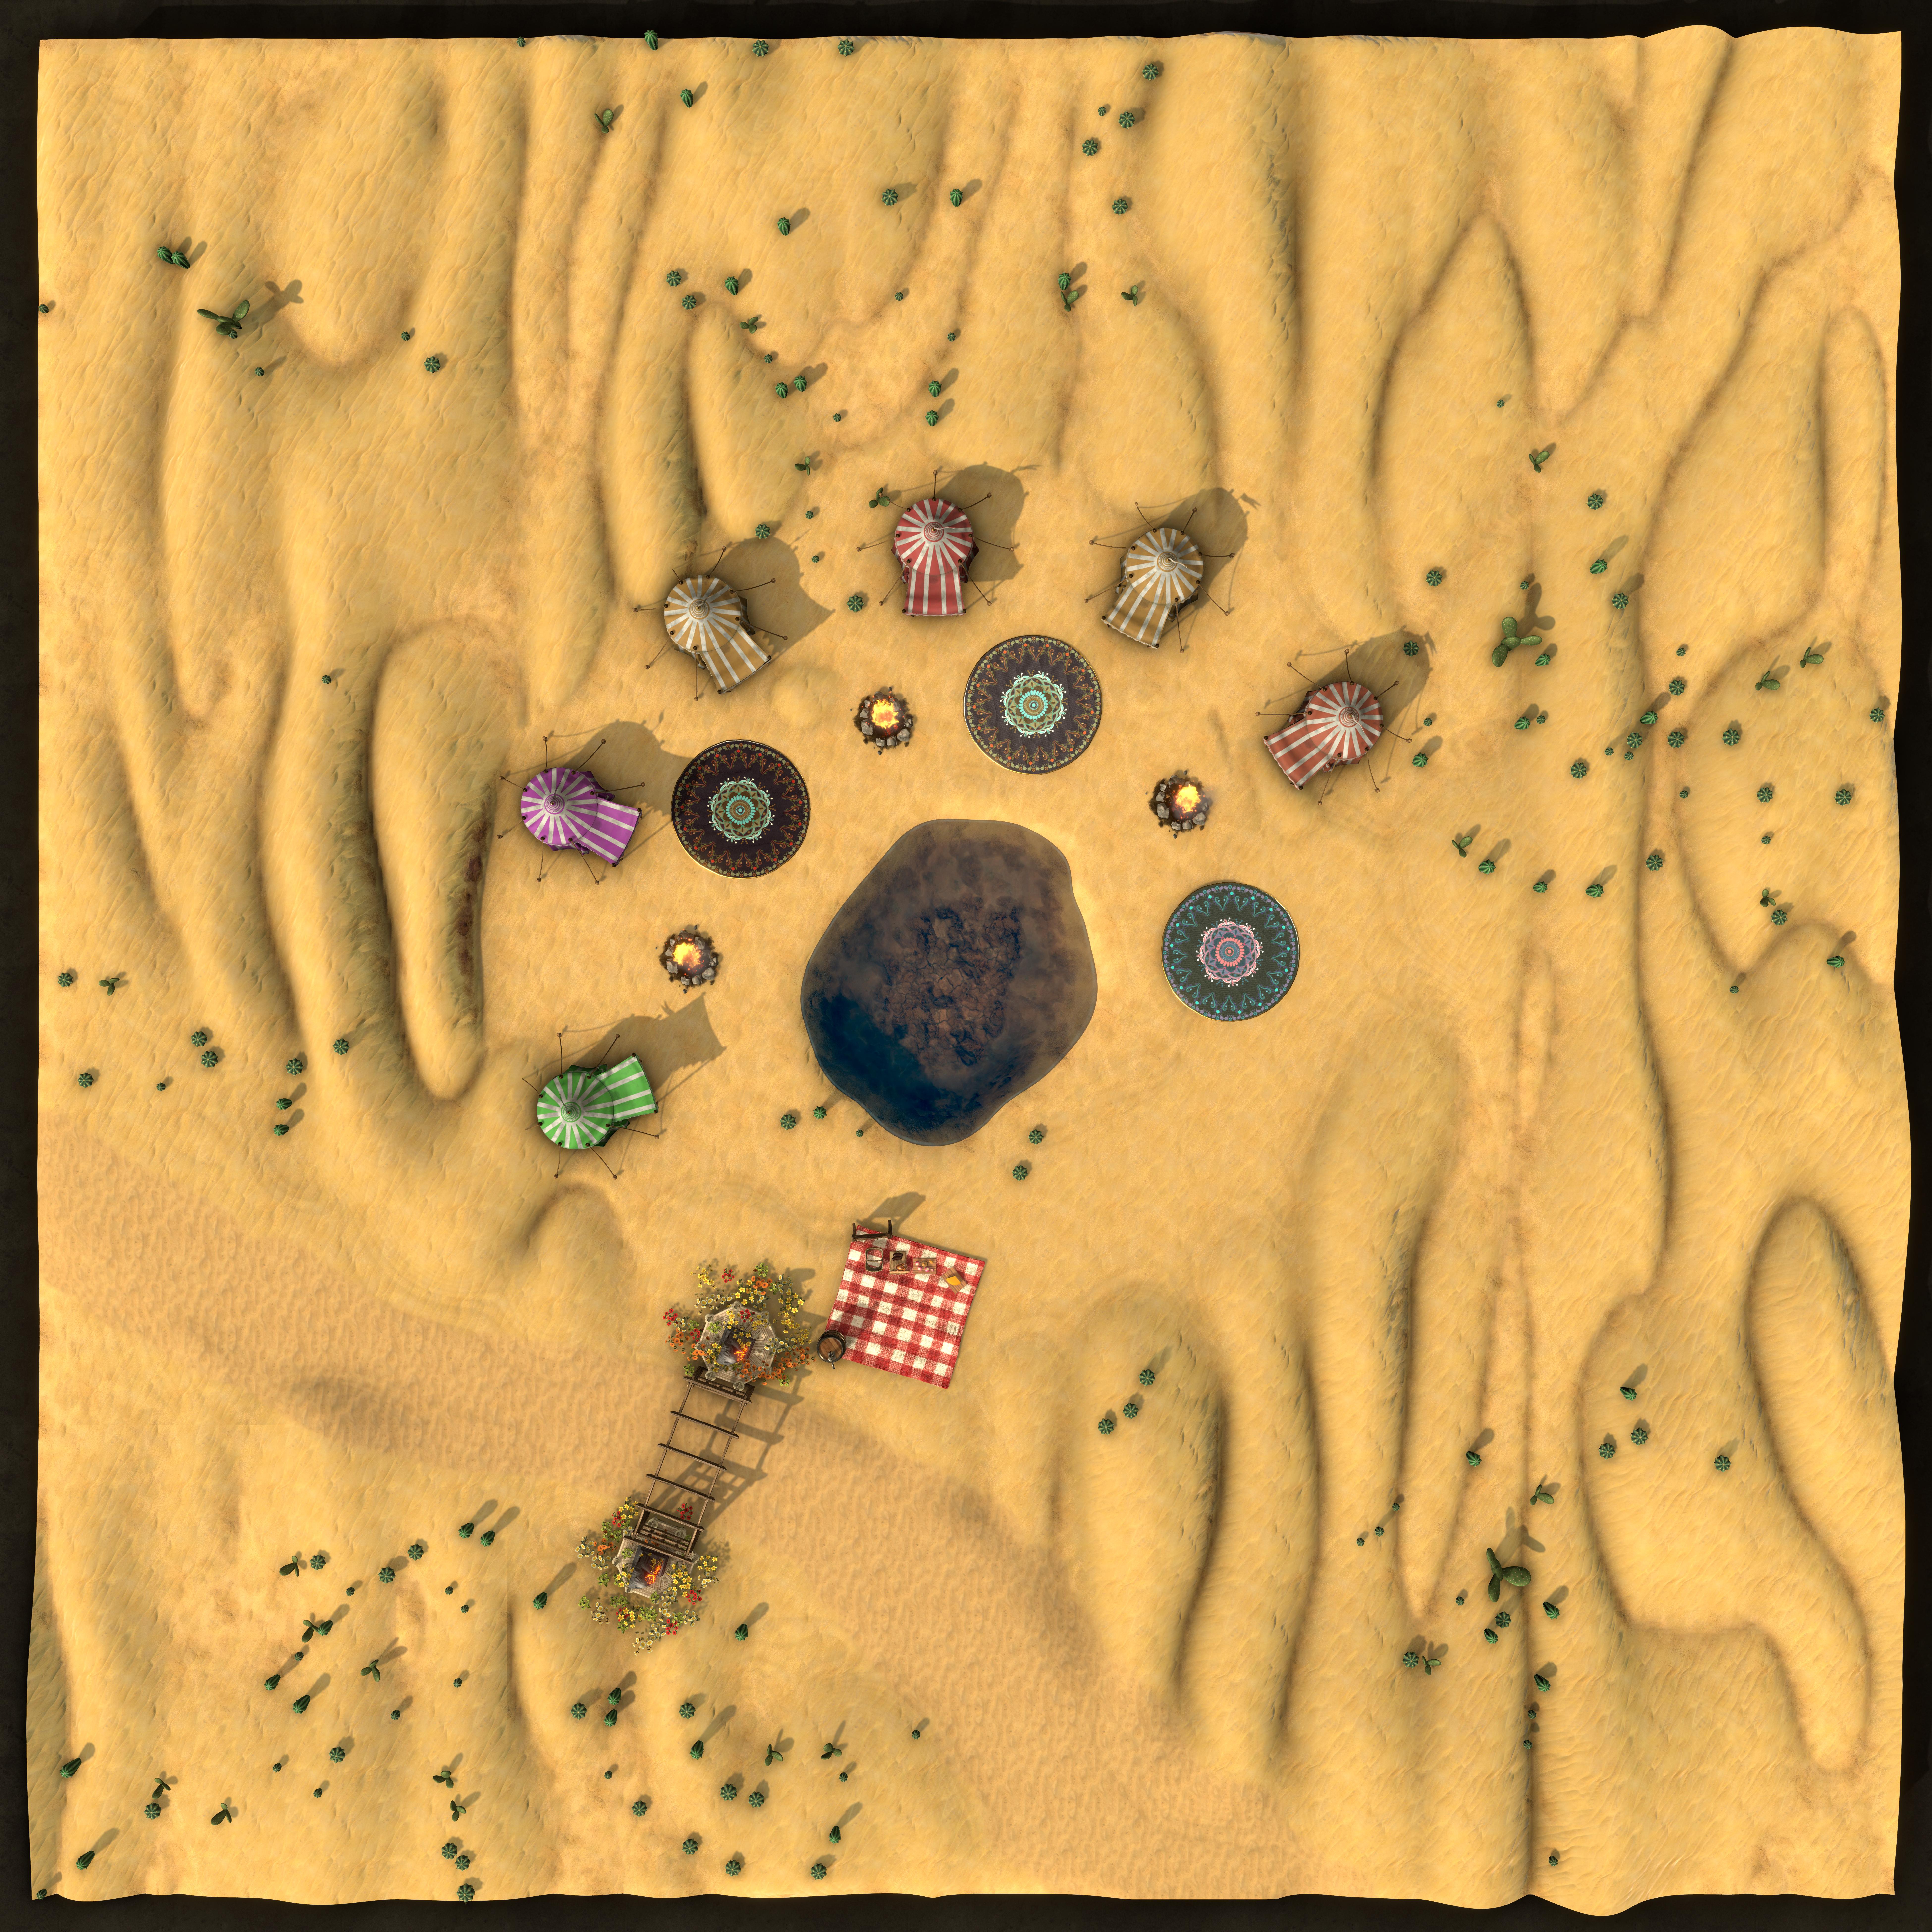
Finally, the food is served. Long trestle tables made from rough-hewn planks of palm wood, and covered with palm fronds, are set up. They are lit with clever oil lamps that throw patterned shadows of flowers and local fish. The roast meat and vegetables are arranged on these tables enticingly, and the entire village feasts for a solid hour. The music is engrossing, the food is fantastic, and people are just grooving on the beach as they picnic and drink fresh-pressed fruit juices.
Professor Enberry, the closest thing the town has to a mayor, is sitting on the beach with you after the meal, picking at his teeth with a splinter prised off of one of the tables. He looks satisfied, and generally happy, and has been telling you how glad the villagers all are that they have been able to move back into their homes in town. You are celebrities in Heaton Bluffs, having liberated the settlement from the ghosts and spooky noises, and there is no shortage of people who want to feed you, surf with you, or teach you how to play the ukelele. Stories abound around beach bonfires, there is pleasant conversation to be had, and there are soul-wrenchingly beautiful seascapes to ponder. The surrounding desert smells faintly of nutmeg. It is a cozy sort of atmosphere.
Then, the story turns to a cautionary tale of woe. A natural spring, destroyed by the works of people. People who found tin, and iron, and precious gems in the desert around a small spot of water. Before too many more years had gone by, the oasis itself had been fouled with heavy salts and industrial waste from the huge mining operation that had sprung up around it. In only a few years, the entire spring was gone, utterly destroyed by the wanton delving and destruction. This was not careful, respectful mining. No, this had been what they call 'strip mining', and it left a huge scar on the desert, like a bedsore that just won't heal. The nation sent soldiers to shut down the entire undertaking. Then, for hundreds of years, the mine lay abandoned.
The newer Goblins on the beach, however, start telling a chilling tale of cultists controlling the mine and the area around it. The Newtnibbler Goblins had been exploring the tunnels inherent in any old mine, when they came across a cadre of humans wielding pickaxes and shouting the "Word of Ignazz"; but the Goblins simply fled before the righteous rage of the gray-clad zealots.
Professor Enberry, who insists that you call him by his first name, Boyce, raises questions about this. It is the first time you have seen him exhibit anything like anxiety, and he is at first cagey about sharing why. At your gentle nudging, however, he tells you that Ignazz is an Efreeti Lord, worshipped by the people of the neighboring country of Rhô, to the east."If these cultists have reopened the mine, not only is it doing irreparable damage to our desert, it is supplying Rhô with Ashsteel. We must find out, and inform the army if necessary! Of course, it will take them months to get here." Boyce turns to you and the rest of your party with an appraising look. "I don't suppose you would be interested in a little scouting mission for us, would you? It would be a paid contract; not a lucrative contract, I am afraid, but enough for you to warrant giving it a thought. We would, of course, supply you with camels and stock you with food and water for the trip. Given your success with Sylphie's Heart, I tend to think this little scouting mission would be right up your alley. And, this would be considered a favor to the nation." With a start, you remember that the laid back and philosophical Professor Enberry is one of Sultan Aaryn Zephyrian's best friends, and amongst his closest advisors. "What say you, adventurers?"
Assuming the characters accept the mission, they will have to think about travel to and from the mine. This generally means acquiring Camels and at least one Sand Skid. The villagers at Heaton Bluffs are quite willing to help the characters out with camels and water, if they are going to travel to the mine. The villagers are quite interested in whether or not Mournshade Mine is active.
As a general rule, characters need a minimum of one gallon of water per twenty-four hours of travel while in the desert, even when only traveling at night. If they opt to travel during the day, that amount doubles. They also need around twenty-five-hundred calories of food per day. Keep in mind that these are absolute minimums, and anything less than this starts leading to levels of Exhaustion, which are cumulative and can easily lead to death.
Preparing for the Trip
The players may want to acquire some things before they leave. Give them the chance to go shopping, get a good meal, and drink their fill. The tea shops in Heaton Bluffs are fantastic, and their bakeries make delicate, spun-sugar pastries that are simply unforgettable. They may want a specific weapon, or new armor, or a specific color clothing. Whatever it is, make it clear that they will be traveling for some time without creature comforts.
On the night that they leave for the mines, the air will be very still and quiet, and all of the villagers will come to see the characters off. The moon is full, the stars are shining, and the camels are well-watered and ready to go.
Traveling to Mournshade
Travel time is essential to the adventure. It emphasizes the landscape and scenery, and the dangers inherent in this part of a greater world. Traveling through any place gives one an appreciation for the scenery and a feel for the locality that is otherwise hard to translate into gameplay. It can foster comaraderie, and engender fantastic roleplay moments.
That being said, it can bog the game down into what feels like a grind to many people, so it is essential to keep the pace moving along. It will take eight nights of travel to get to Toun, which is the assumedly abandoned village at the end of the Noonshade Road. The unmaintained path that the locals choose to call a "road" is formed of hard packed sand, and is marked well enough to be able to follow if one is careful about it.
The Noonshade Road merges with the Sandeep Road, out of Darra to the south, shortly before reaching the small, recently repopulated village of Toun. The dummy map leads the characters out east, however, following a line of standing stones to the Tomb of Barrax.
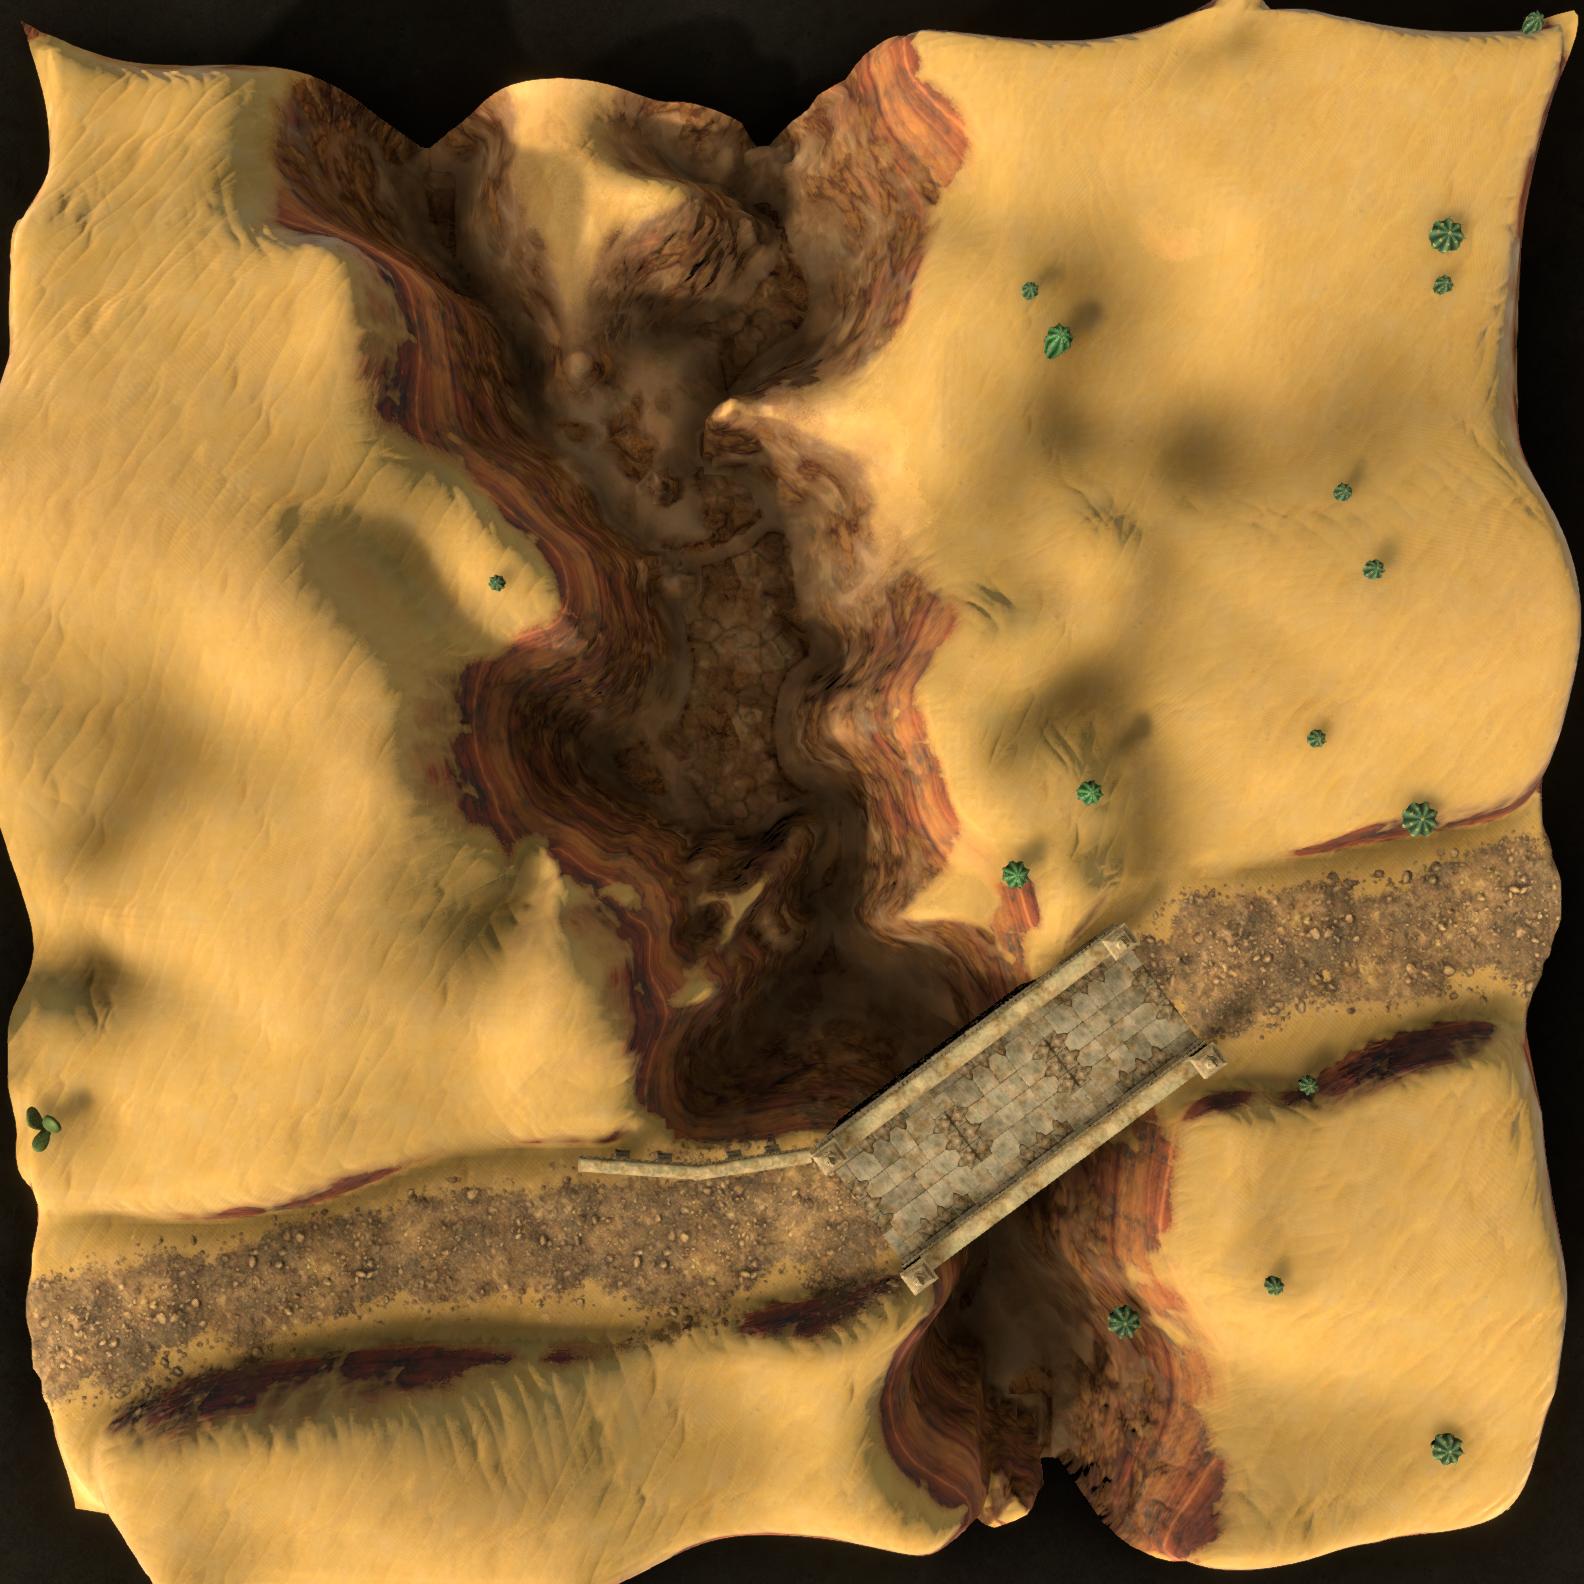
Desert Battlemaps

While they are traveling, be sure to emphasize the savage beauty of the landscape, and the danger inherent in simply being in a desert. Birds are wheeling overhead, and the whispering sound of sand sliding down the sides of dunes can oft be heard. The smell of desert flowers hangs delicately in the air as the party proceeds.
- Twice a night, have a random player roll 1d10 . On a 1, there will be a Random Encounter.
- Consult the Encounters table in the Desert Travel article.
- Also, roll 1d10 while the characters are camped for the day, to determine if there is a random encounter while they sleep.
- Each day, while they rest, determine the upcoming weather by rolling on the table in Desert Travel.
- The party must shelter during inclement weather, etc.
- Make sure to give the party non violent means to escape any situation that arises; some of the desert encounters can be quite challenging.
Detour
The map provided by Boyce has been swapped out with a clever forgery! Cruce Sybill sent a summoned Shadow Demon to steal the original and replace it with this one.
Instead of the Mournshade Mine, the characters will find the site of the Tomb of Barrax. This is either entirely accidental, or mandated by fate, because the edited map was supposed to lead the party out into the desert to die of exposure and exhaustion.
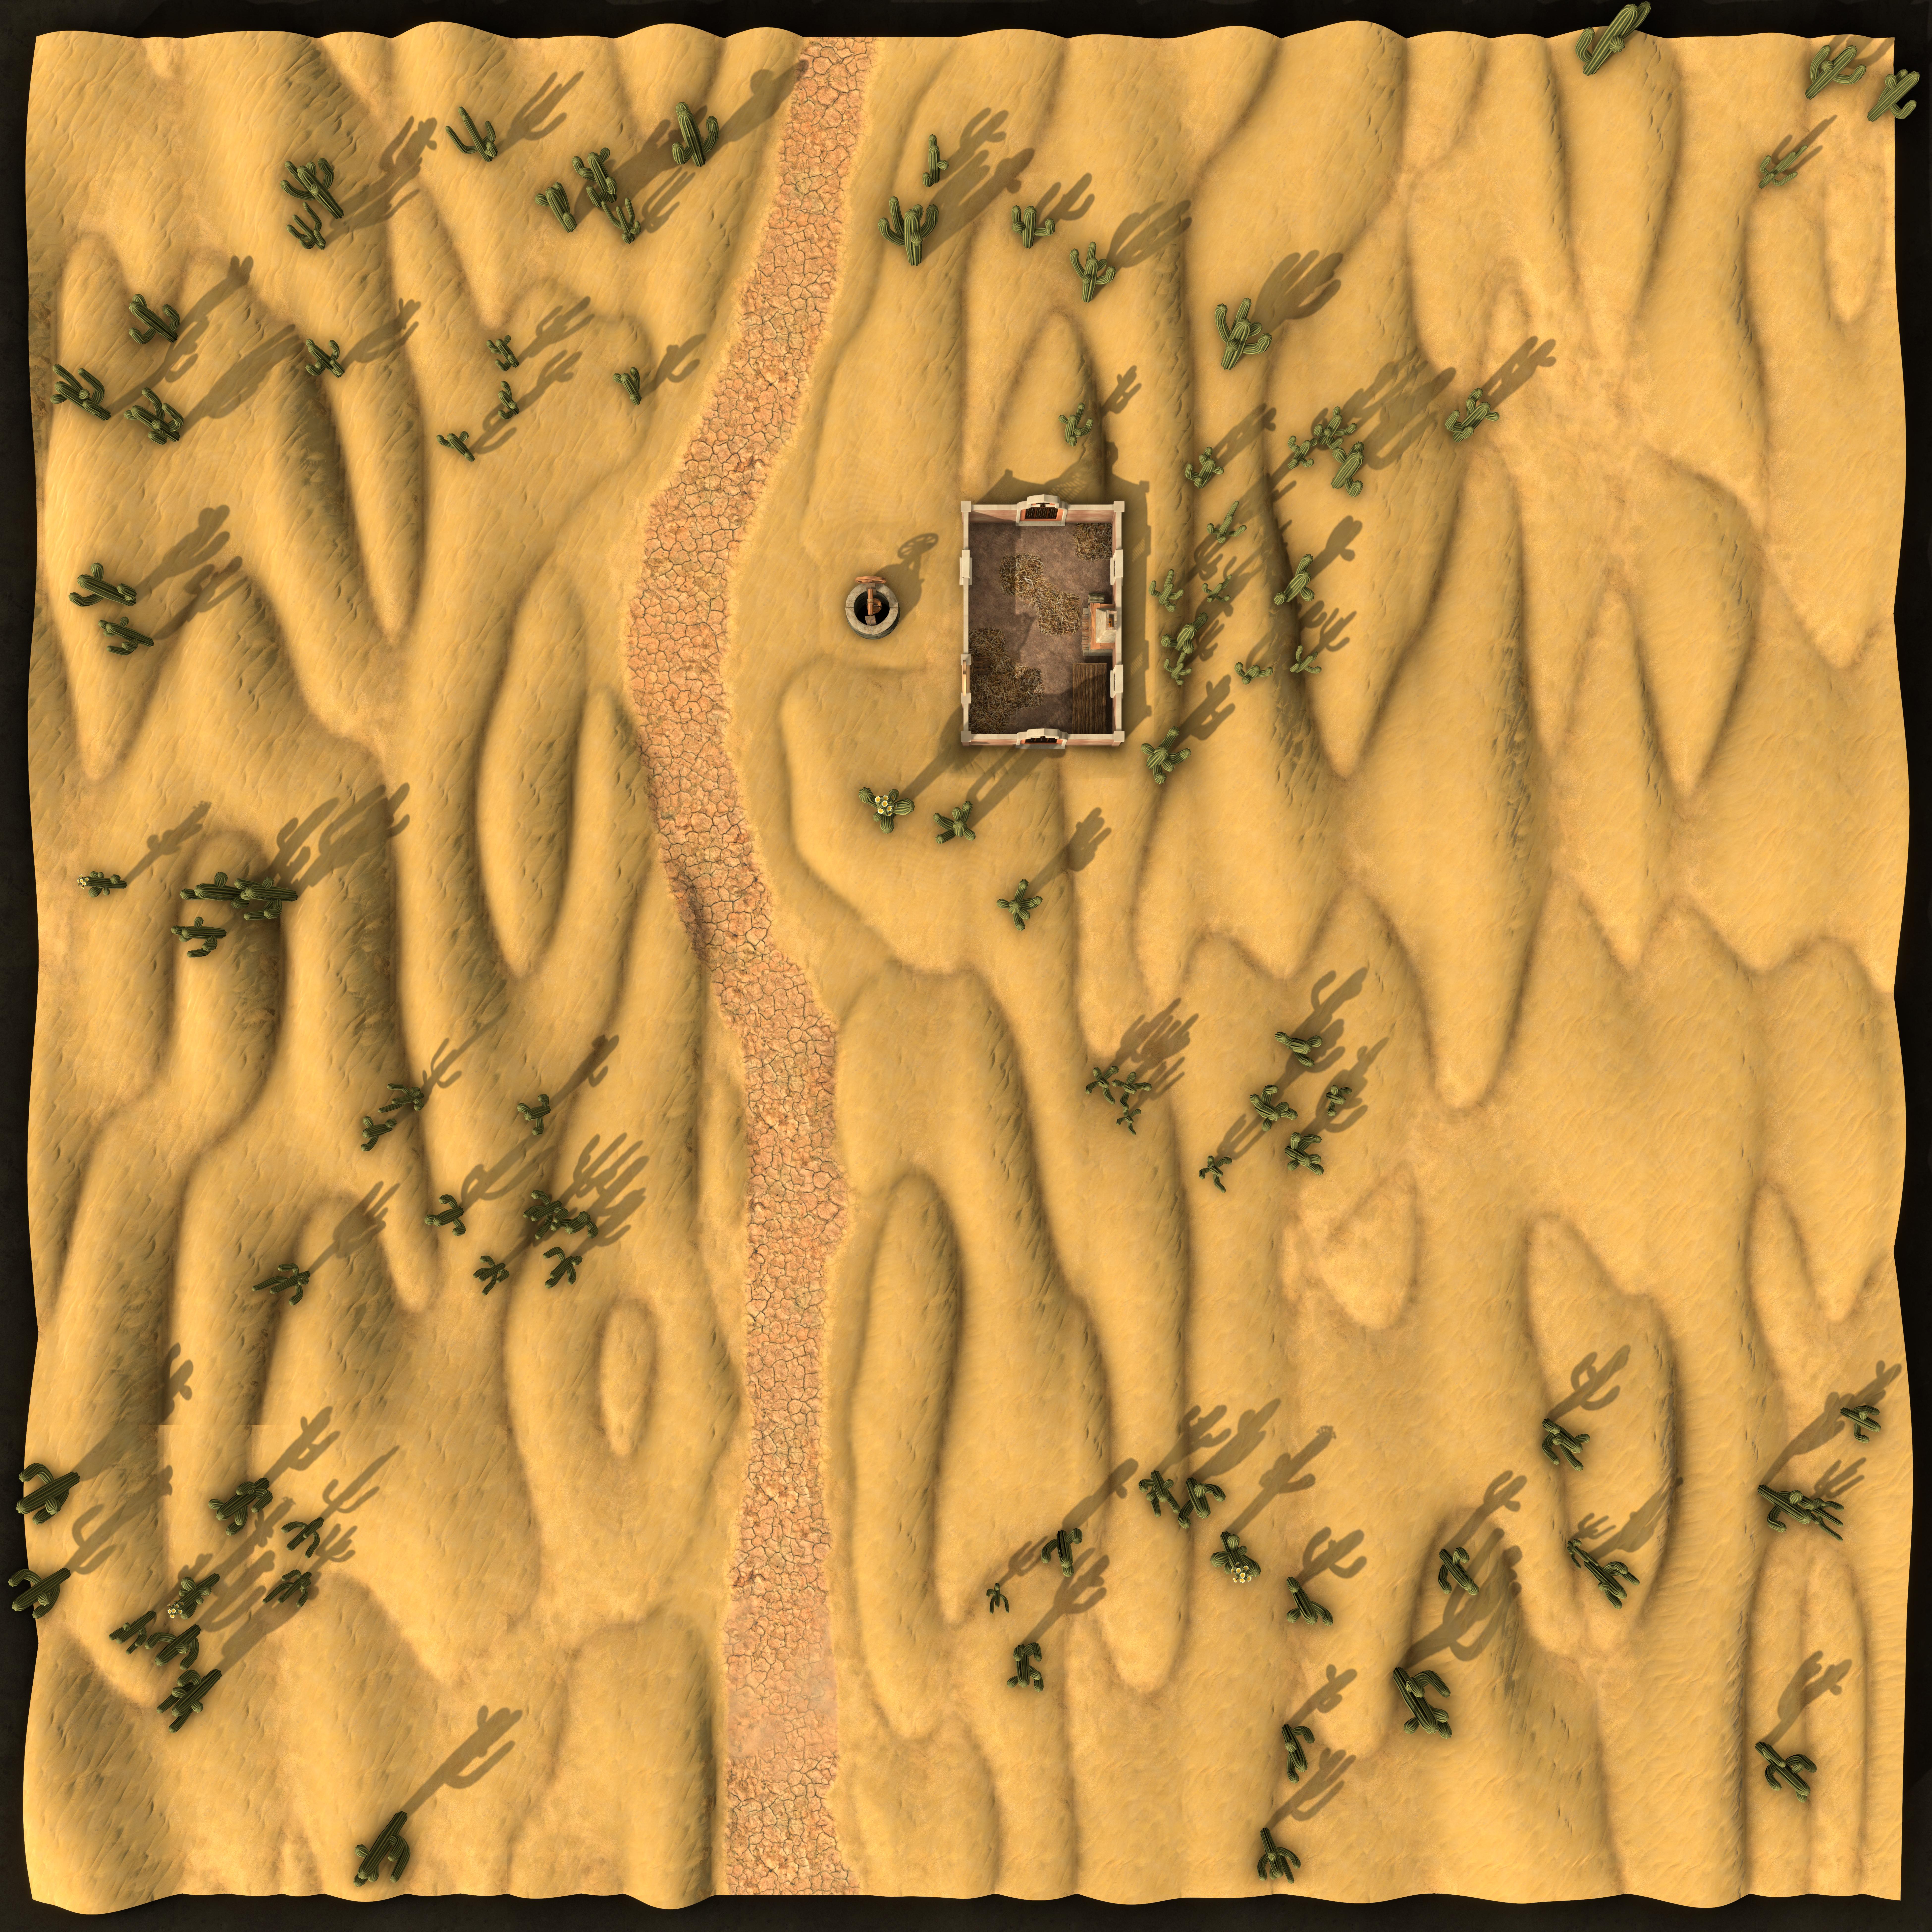
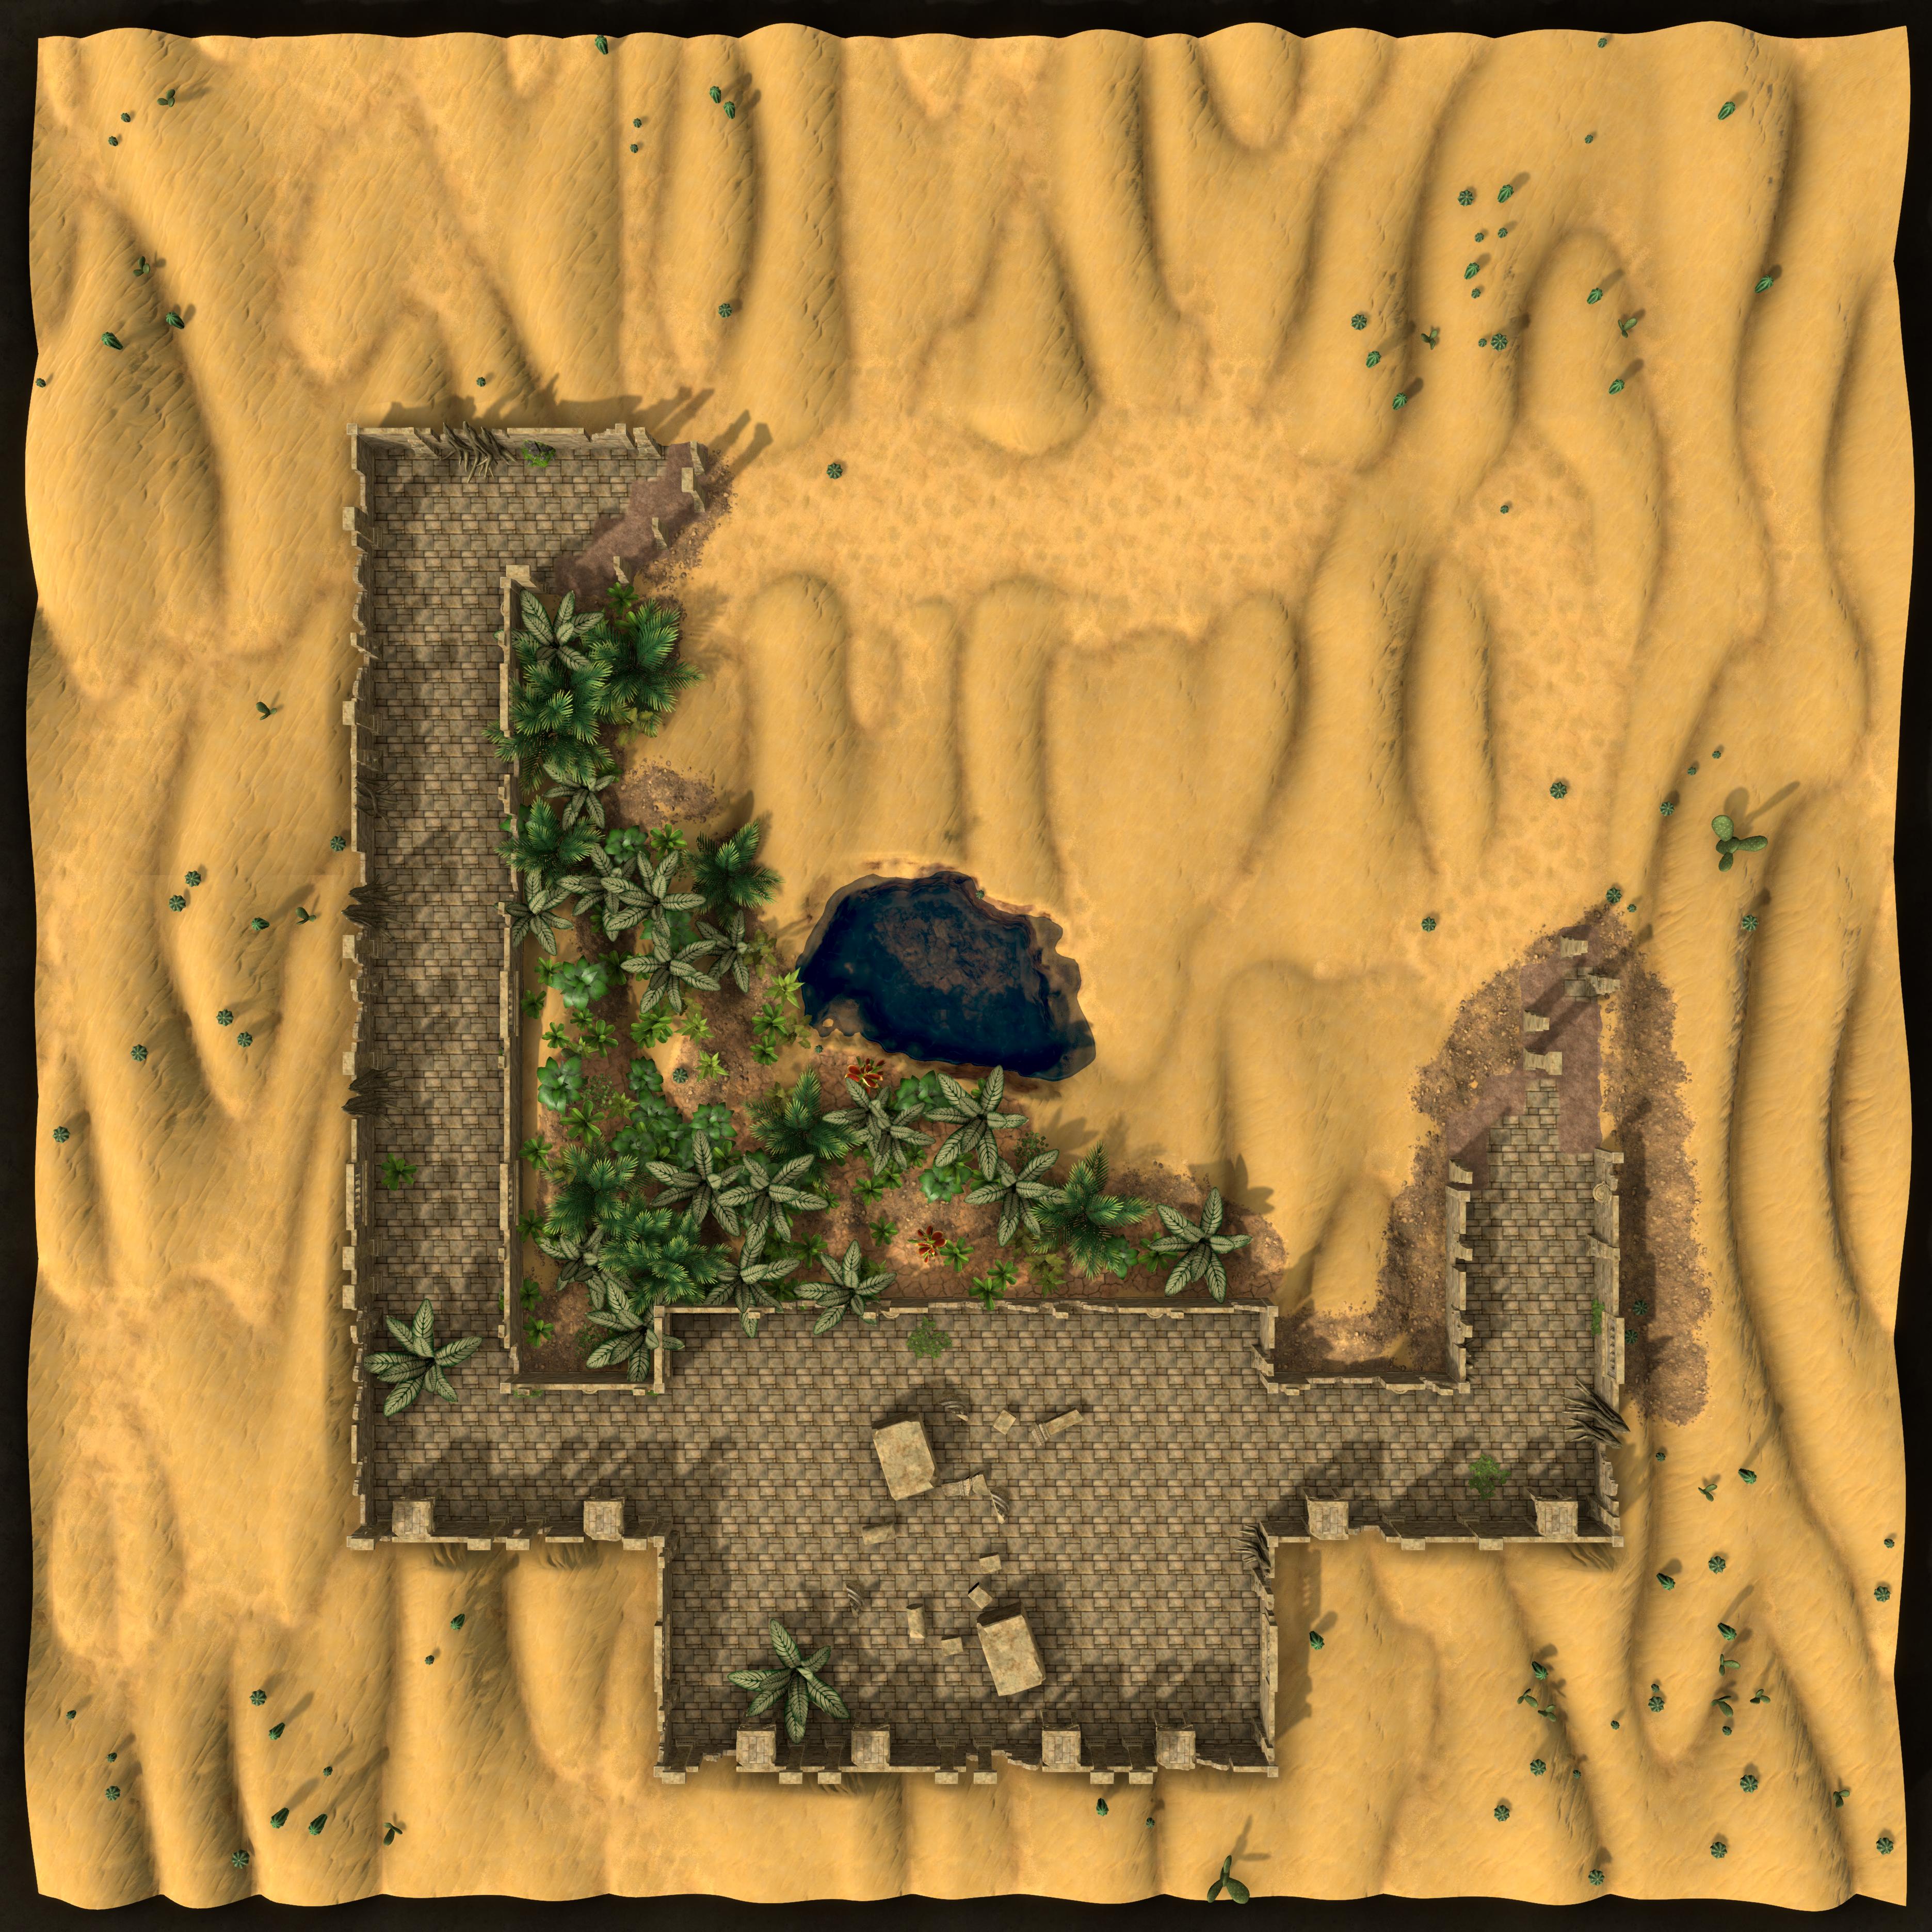
You have observed the instructions on the map, and followed the standing stones leading east from the intersection of the Sandeep and Noonshade Roads for two nights, and here before you lies the entrance to what is obviously a tomb. It is an elaborate carving of sigils and shapes with obvious mathematical origins, made out of a single giant sandstone block, carved out in the middle to allow access. The entryway had been plugged with a huge rock, but a recent earthquake must have crumbled it, revealing a darkness beyond that piques your adventurous interest. You could clear the rubble away with only a little work, and explore this ancient tomb. Who knows what treasures lie within?

GM Note: Gameplay
A DC15 Intelligence(History) check while examining the entrance will reveal that this is the grave complex of Barrax the Sage, a famous mathemetician and logician, who led thousands of people into battle against the raging armies of Efreeti that came slavering out of the east. He is credited with many modern day math principles.
GM Note: Mechanics
If the players choose not to explore the tomb out of a sense of respect and decency they will gain Heroic Inspiration.
GM Note: Gameplay
A map inscribed on the entrance to the tomb references a place called the "Noonshade Oasis"; on a DC12 Intelligence(History) check, the characters will suss out that the Mournshade Mine is on the site of the former Noonshade Oasis. The map lays out the directions to the oasis, which leads directly to the modern village of Toun.
If the characters do, indeed, decide to explore the tomb, run the adventure detailed in the article Tomb of Barrax. Their choices will affect the outcome of the adventure, with a few different scenarios provided for the ending.
Once the party has resolved the Tomb of Barrax, one way or another, they will get back on the road. If the players are having a hard time figuring out where to go next, make sure their characters see the engraved map leading to the oasis. They may also opt to head back to Heaton Bluffs, where they will learn that their map was switched out, and can get an accurate replacement, or even a guide if they wish.
Approaching Toun
Traveling along the Noonshade Road has come to an end, and in the distance the party can see and smell the smoke of many cookfires. They will know that the "abandoned" village of Toun is up ahead, because of the map, or perhaps they have a guide with them; but they will be under the impression that Toun has lain empty for many decades. If the party has a guide, that guide will go no further, and will make camp in a hidden dell between large dunes to wait for the party to explore ahead.Ahead of you lies the village of Toun, a settlement that was supposedly abandoned many years ago. Here it is, however, entirely rebuilt, and even somewhat bustling. The smell of cook fires fills the air with savory aromas that make your mouth water after the asceticism of travel. You spy gardens, meaning there is vegetation, which in turn means there is an abundant water source. Laundry hangs drying between multi-level clay plaster buildings, many of which have boards spanning the upper reaches of the spaces between them. The buildings are washed white, or pink, and each has its very own wind catcher. You can smell a bakery from where you are, and hear the clang of metal being worked clearly, even from this distance.
A small sign along the side of the Noonshade Road reads "Welcome to Toun, population, 321". With a low mournful whistle, a train announces its presence far off in the distance. This is no abandoned town, it is a positively prosperous village!
As you approach, a small delegation of people comes out to meet you, led by a middle aged woman with kind eyes and an easy smile. "Greetings, travelers, and welcome to Toun!" she says, "I am Crea, the village's Visitor Coordinator. It is my job to see that you are well and properly welcomed, housed, and fed, according to the custom of the desert, and according to our own standards of fare! We are pleased to welcome you to Toun! If you would follow me, I have some cucumber water chilling, and we have rooms and meals ready and waiting for you. I took the liberty of having the chef make some of his cold potato-leek cream soup; it was a favorite amongst the nobles at court while he served there. It is a wonderful beginning to a meal after a long journey through the Sunrathe Wastes; plus I'm sure you're ravished with thirst."
She walks with you, keeping up a stream of friendly chatter as you go, shortly arriving at a sprawling, one storey hotel with a sign reading "Cecil's" over the double front doors. She ushers you in with a polite smile, happy to show off her cozy establishment.
GM Note: Gameplay
While Crea is bubbly and animated, dressed in a practical white robe and black and white checked head scarf, her four helpers are quiet and demure women wearing long brown robes tied at the waist with rope. Their red head scarves are secured with a brown band. They are all members of The Etched, with Crea teaching the four apprentices the fine art of dealing with outsiders. Thier brands and ritual scarring are all hidden on their backs and upper arms; Etched Ember Whisperers do not mark their faces, forearms, hands or calves in an effort to remain unobtrusive while they are traveling outside of their homeland of Rhô. It is a real sacrifice, as their lack of visible scarring is considered unattractive in their society.
GM Note: Gameplay
Crea Cartwright is a high ranking Etched Ember Whisperer who has clawed her way up the ranks of The Etched. Her outward personality is bubbly and friendly, and she will act as if seeing to the comfort of the characters is the best thing that has ever happened to her. Her deception skills are fantastic, and Insight checks against her are made at disadvantage.
Crea is the only one of the Welcoming Committee who speaks; the other members of her party do no more than nod and offer up ceramic cups of cool water. if they are addressed directly, they will bow with an awkward smile and look pleadingly at Crea, who will explain to the characters that the assistants have taken vows of silence and cannot speak. Crea tells the party that her helpers are a sect of Aeryn monks who practice silence part of the year.
GM Note: Gameplay
Crea will subtly probe the characters, to find out if there is anyone that knows where they are, and why they have come. She will at first be trying to convert them, by convincing them to come to a seance that night in the great room, but if she finds out they are working, even by extension, for Aaryn Zephyrian, the characters are in mortal peril. The only thing keeping them alive at that point is her fear that the Sultan would bring an army down on Toun if his Royal Diviners found out the characters died there; but she is not above disappearing them in their sleep to a hard-labor salt mine in Rhô, should the need arise
Cecil's Hotel
As the characters enter the great room of Cecil's Hotel, the stress and uncertainty of the road seem to melt away. This is due to Crea deploying specific essential oils to evoke warm memories of childhood homes. The entire scene is subtly and specifically crafted to encourage one to let one's hair down, and to allow one's tongue to wag. The characters are the only people in the entire room once the food and drink are served, and Crea leaves with her assistants. There is no bartender, only a fully stocked bar, including enough garnishes and fruit wedges for a busy taproom.
The interior of the room is the very definition of "comfy". It is well lit by heatless alchemical lamps, but not glaringly so. It is cooler than the night air outside, but not cold. It is decorated with the brilliant pastels of a desert sunset.
You could swear you keep catching faint whiffs of cinnamon and peppermint as you sit at a sturdy wooden table with a beautiful grain pattern on full display in its polished top. "Desert Sumac," Crea says proudly of the tables. "We made them here ourselves as we rebuilt the town. There were lots of trees growing right out of the floors and through the roofs, so why not make the furniture out of them, right? They're hardwood, after all, and just look at that chatoyancy..." she continues to chatter as she walks away toward the kitchen. Returning quickly wheeling a ceramic tureen full of potato-leek cream soup on a small brass cart before her, she ladles the perfect amount into bowls that she deftly passes around the table before garnishing each of them with a pinch of fresh, chopped dill, and a dollop of sour cream if desired. Finished off with freshly ground pink peppercorns, the bowls of soup are gourmet masterpieces. "Enjoy!"
Crea beams at you as she prattles away, busily serving up warm loaves of honey glazed bread that perfectly compliment the cold, savory, soup. She sets down a large pewter bowl of shelled cashews for the table to share when not actively eating soup, while her assistants silently come and go with tea carts, bread trolleys, and bins for wheeling dirty dishes away to the wash room. Once she has you settled in and comfortable, Crea shoos her assistants away and retreats into the kitchen to give you some privacy. The sudden silence is only broken by the sound of the grandfather clock in the corner.
The characters may wish to discuss their current situation, or to eat in silence. Whatever they decide to do, if they try to leave the Cecil without an escort, Crea will appear by their sides all smiles and willingness to help navigate the village, but she will be trying to get them back to the hotel the entire time. When day breaks and everyone is going to bed, it is illegal for strangers to wander around the city after ten o'clock AM. If the players wish to do some shopping, Crea will bring merchants to them at Cecil's.
If asked about a smith in town, Crea will deny having one, despite the clear sounds of metal being worked somewhere in the village. If questioned about the noise, she will say that it's not that they do not have a smith, it is that they only have a private smith. He only makes "custom tools and fittings", and "is not interested" in making weapons or armor.
The truth is that the sounds of metal work ringing throughout the village are the result of The Etched working iron into Ashsteel, a secret they will kill to keep quiet.
Crea has advantage on Deception checks while inside the hotel. Additionally, characters have disadvantage on Insight checks against her and her assistants while within ten feet of the building. This is due not to magic, but to strategic aroma therapy.
Crea also has advantage on Perception checks made to overhear or otherwise spy upon the party while within the hotel. There is a closet in the kitchen from where Crea can see and hear the party unobserved, thanks to simple line-of-sight and well placed acoustic tiles. Her silent assistants are also spies.
The townsfolk of Toun will not speak to the player characters. Even when spoken directly to, the locals will refer the characters right back to Crea, who will act as liaison. Stores will lock their doors as they approach, and "open" signs will be turned around to "closed" if the party tries to explore the village. People will hurry away from them as they approach. The constant sounds of hammer on steel will cease.
The Etched living in town will defend themselves if need be, but other than that they will go to great lengths to avoid the characters altogether.
Conflict
It will be pretty obvious, very quickly, that something suspicious is going on in the town. The characters are being herded into Cecil's, and not even ignored but actively avoided by everyone outside of the hotel's walls. Crea's silent assistants are pleasant enough, if nearly noncommunicative, but other than that no one will even exchange words with the player characters.
Finding the Mine
Given the circumstances - that the entire village is populated by cultists of Ignazz the efreeti - no one in Toun wants the party to know about the mine at all, let alone that the Ashsteel Commune has been working it. Crea the hotelier will stand firm by the lie that the mine has been reclaimed by the desert, and none of the villagers are sure of where it was.
There are clues, however, that the more perceptive characters can piece together.
For instance, there is a regular train whistle out in the desert; a low, mournful sound that Crea will swear is the cry of a creature they call a "Snipe Bird". There is also a road that leads out into the desert to the northwest, but Crea says it only goes as far as a nearby wadi.
The real kicker, however, will be an anonymous map leading from the village to the mine scar. This will come from one of Crea's silent assistants, whose plan is to send the characters to their deaths at the hands of the miners. She and one of the mine's site-bosses are conspiring to usurp Crea within the year.

However it happens, have the characters discover that the mine is only a few miles away, right up the wagon-path to the northwest. There is a railway leading away from the mine, through the desert, to the east toward Rhô; hence the occasional lonesome train whistle. There are also wagons that leave every morning, drawn by camels, and return every night carrying heavy loads. Crea will tell the characters they are collecting Tazrim, which is indeed a heavy mineral; but they are delivering iron ore to the smelters in the village, for the production of Ashsteel to begin.
GM Note: MechanicsWhen they find the mine, the characters will advance to level four. Give the players some time to level up.
There are many ways the characters could handle the situation they find themselves in, ranging from stealthily meandering up the wagon track to full blown carnage. They may also decide to turn around and go back to Heaton Bluffs, believing they have completed their mission's objective just by finding Toun active and full of people. Encourage them to visit the mine and get "eyes on", if necessary.
Stealthfully approaching their exit from the town would be easiest for them, although they have no water or food to take with them. It is only an hour walk to the mine from Toun. Allow them opportunities to quietly make their way to the edge of the mine, and decide how they would like to approach the zombie problem.
Fullblown "hack-and-slash" is, of course, always an option. If the players do decide to go this route, leave them room to escape down the wagon trail to the northwest. The villagers will not follow, as most of them are afraid of the zombie miners that the mine's bosses animate and control. Most of the villagers are not interested in fighting, except some of The Etched.
Rising Action
Outside the Mine
Ahead of you lies the mine. You have been tasting dust as you approach, and the sandy cloud has forced you to cover your face. The wind scrapes the tiny particles against any exposed skin like sandpaper on dry wood, but you are seasoned desert travelers by now and have girded yourself against such an eventuality. The processing plant comes into view, first. A massive, multi storey construct, it has a railway track leading out and away from it, to the east. Empty wagons are lined up outside of the enormous building, awaiting a load, and laden carts queue up to head down the road to Toun. There is activity, around the building, but it is slow, and jerky, like the workers are very stiff, or maybe injured in some way. As you get closer, though, you realize to your horror that they are all...
...Zombies.
Skirting around the gigantic building, moving toward your left, you head west and quickly find the lip of the mine. It is a sheer cliff, sixty feet to the bottom, to bare earth rubbed raw by chisels and hammers. Railway tracks snake across the floor of the mine like hungry serpents to the far wall, more than three hundred yards out, where the ground is being carved away by the undead laborers. Mine carts are pushed along the rails by zombies, which bring the loaded wagons to the processing plant, and the empty ones back out to the work site. Three men in black robes walk around the floor of the scar, brandishing silver-topped, ebony canes officiously. They are obviously ordering the zombies around, although you cannot hear what is being said.
Suddenly, a shout rings out from the nearby building; "Help! Help me, please!" Then, a loud retort slaps forth, like a firecracker going off, before an eerie silence settles over the acreage. The only sounds are the high pitched creaking of cart wheels along the iron railway tracks off below you in the mine. A light flashes twice from a dimly lit upstairs window of the processing plant; out toward the desert, away from the mine. Then, the window goes dark, but not before you see the silhouette of a man peering out of the window.
The zombies in the mine continue working with their black-robed bosses' religious fervor, taking no notice of any disturbance or interruption. The quiet of the desert is otherwise absolute.

There are twelve Zombies slowly but persistently working the mine, and three Etched Necromancer Acolytes roam the work site, each with a Rod of Zombie Mastery.
Inside the processing plant are another six zombies, and the mine's Overboss, an Etched Necromancer Deacon who knows the characters are there and is watching them intently, trying to entice them to come into the building. He plans to waylay them with zombies and magic, take them prisoner, and send them to the labor camps in Rhô for questioning and detainment.
This is actually a power play, as the Overboss and one of Crea's assistants are trying to make Crea seem incompetent enough to replace; and by extension, make Crea's biggest supporter, Cruce Sybill, seem dangerously inept.
Climax
The action is quickly coming to a head as the characters approach the Processing plant on the south side of the mine. The residents are aware of, and waiting for, the characters, thanks to their Overboss' conspiracy with Crea's assistant. The overboss is waiting upstairs, trusting in his Acolyte to handily dispose of the characters.
The Processing Plant
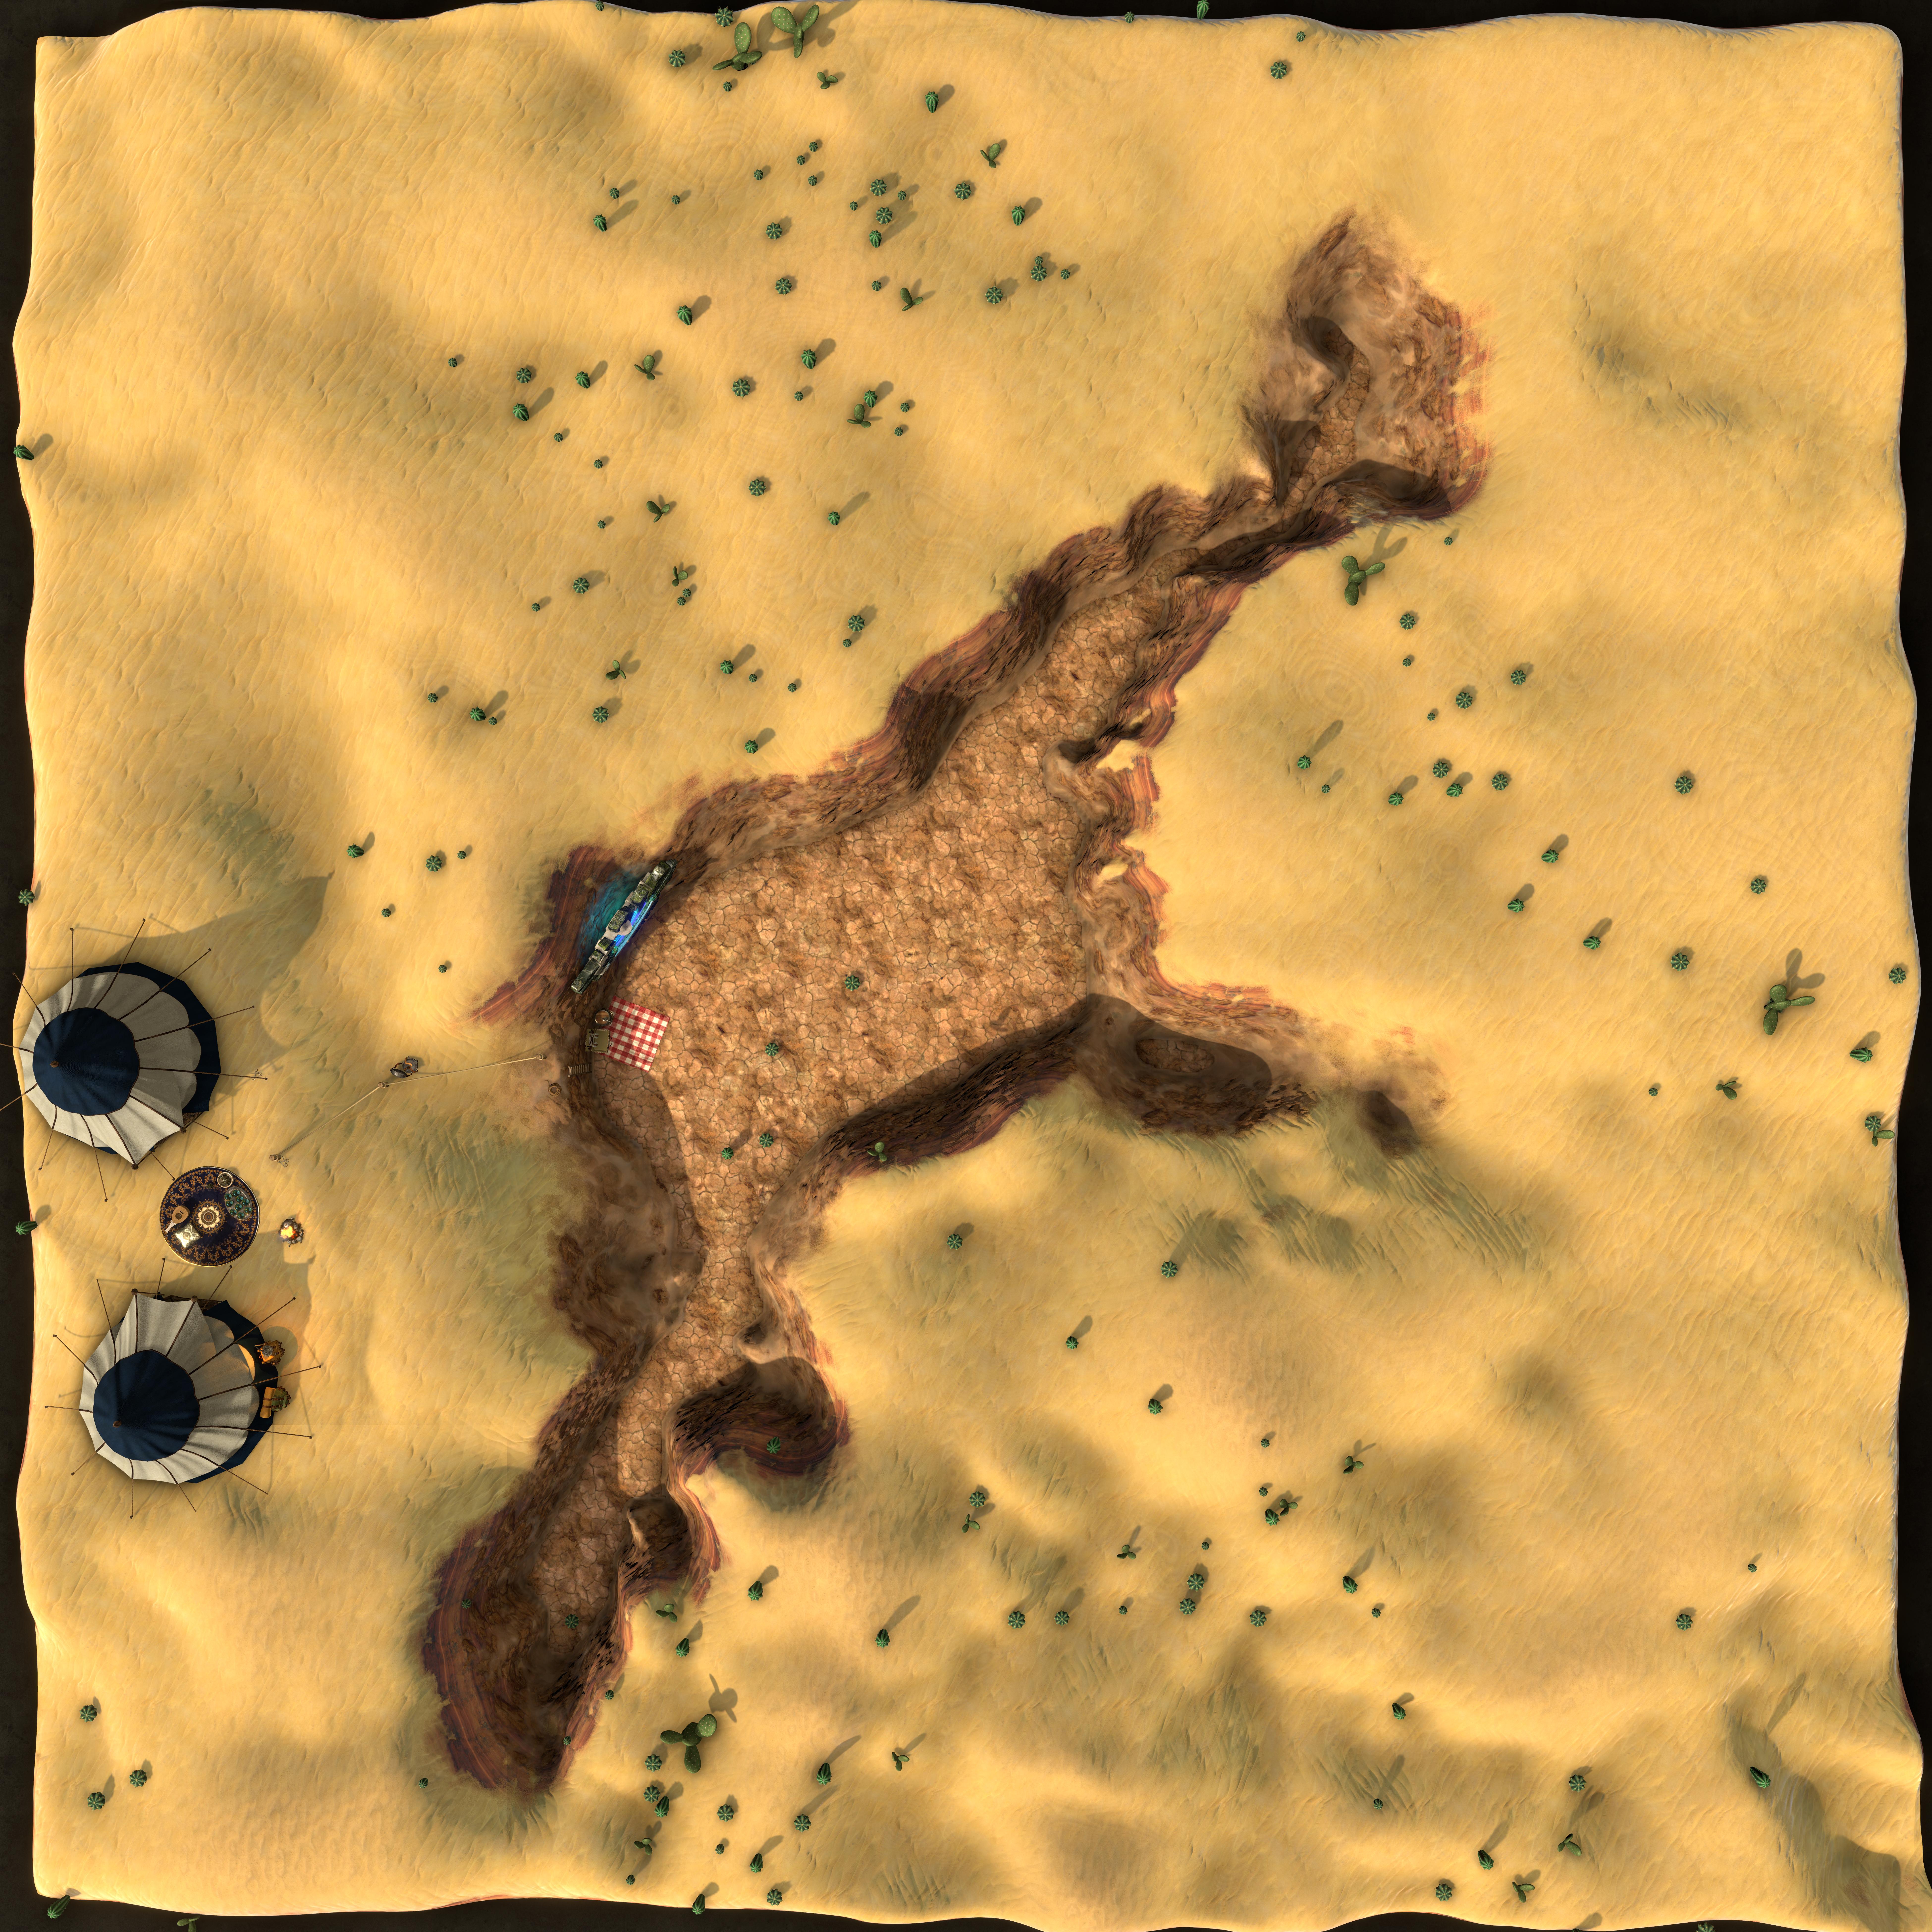
Mournshade Battlemaps
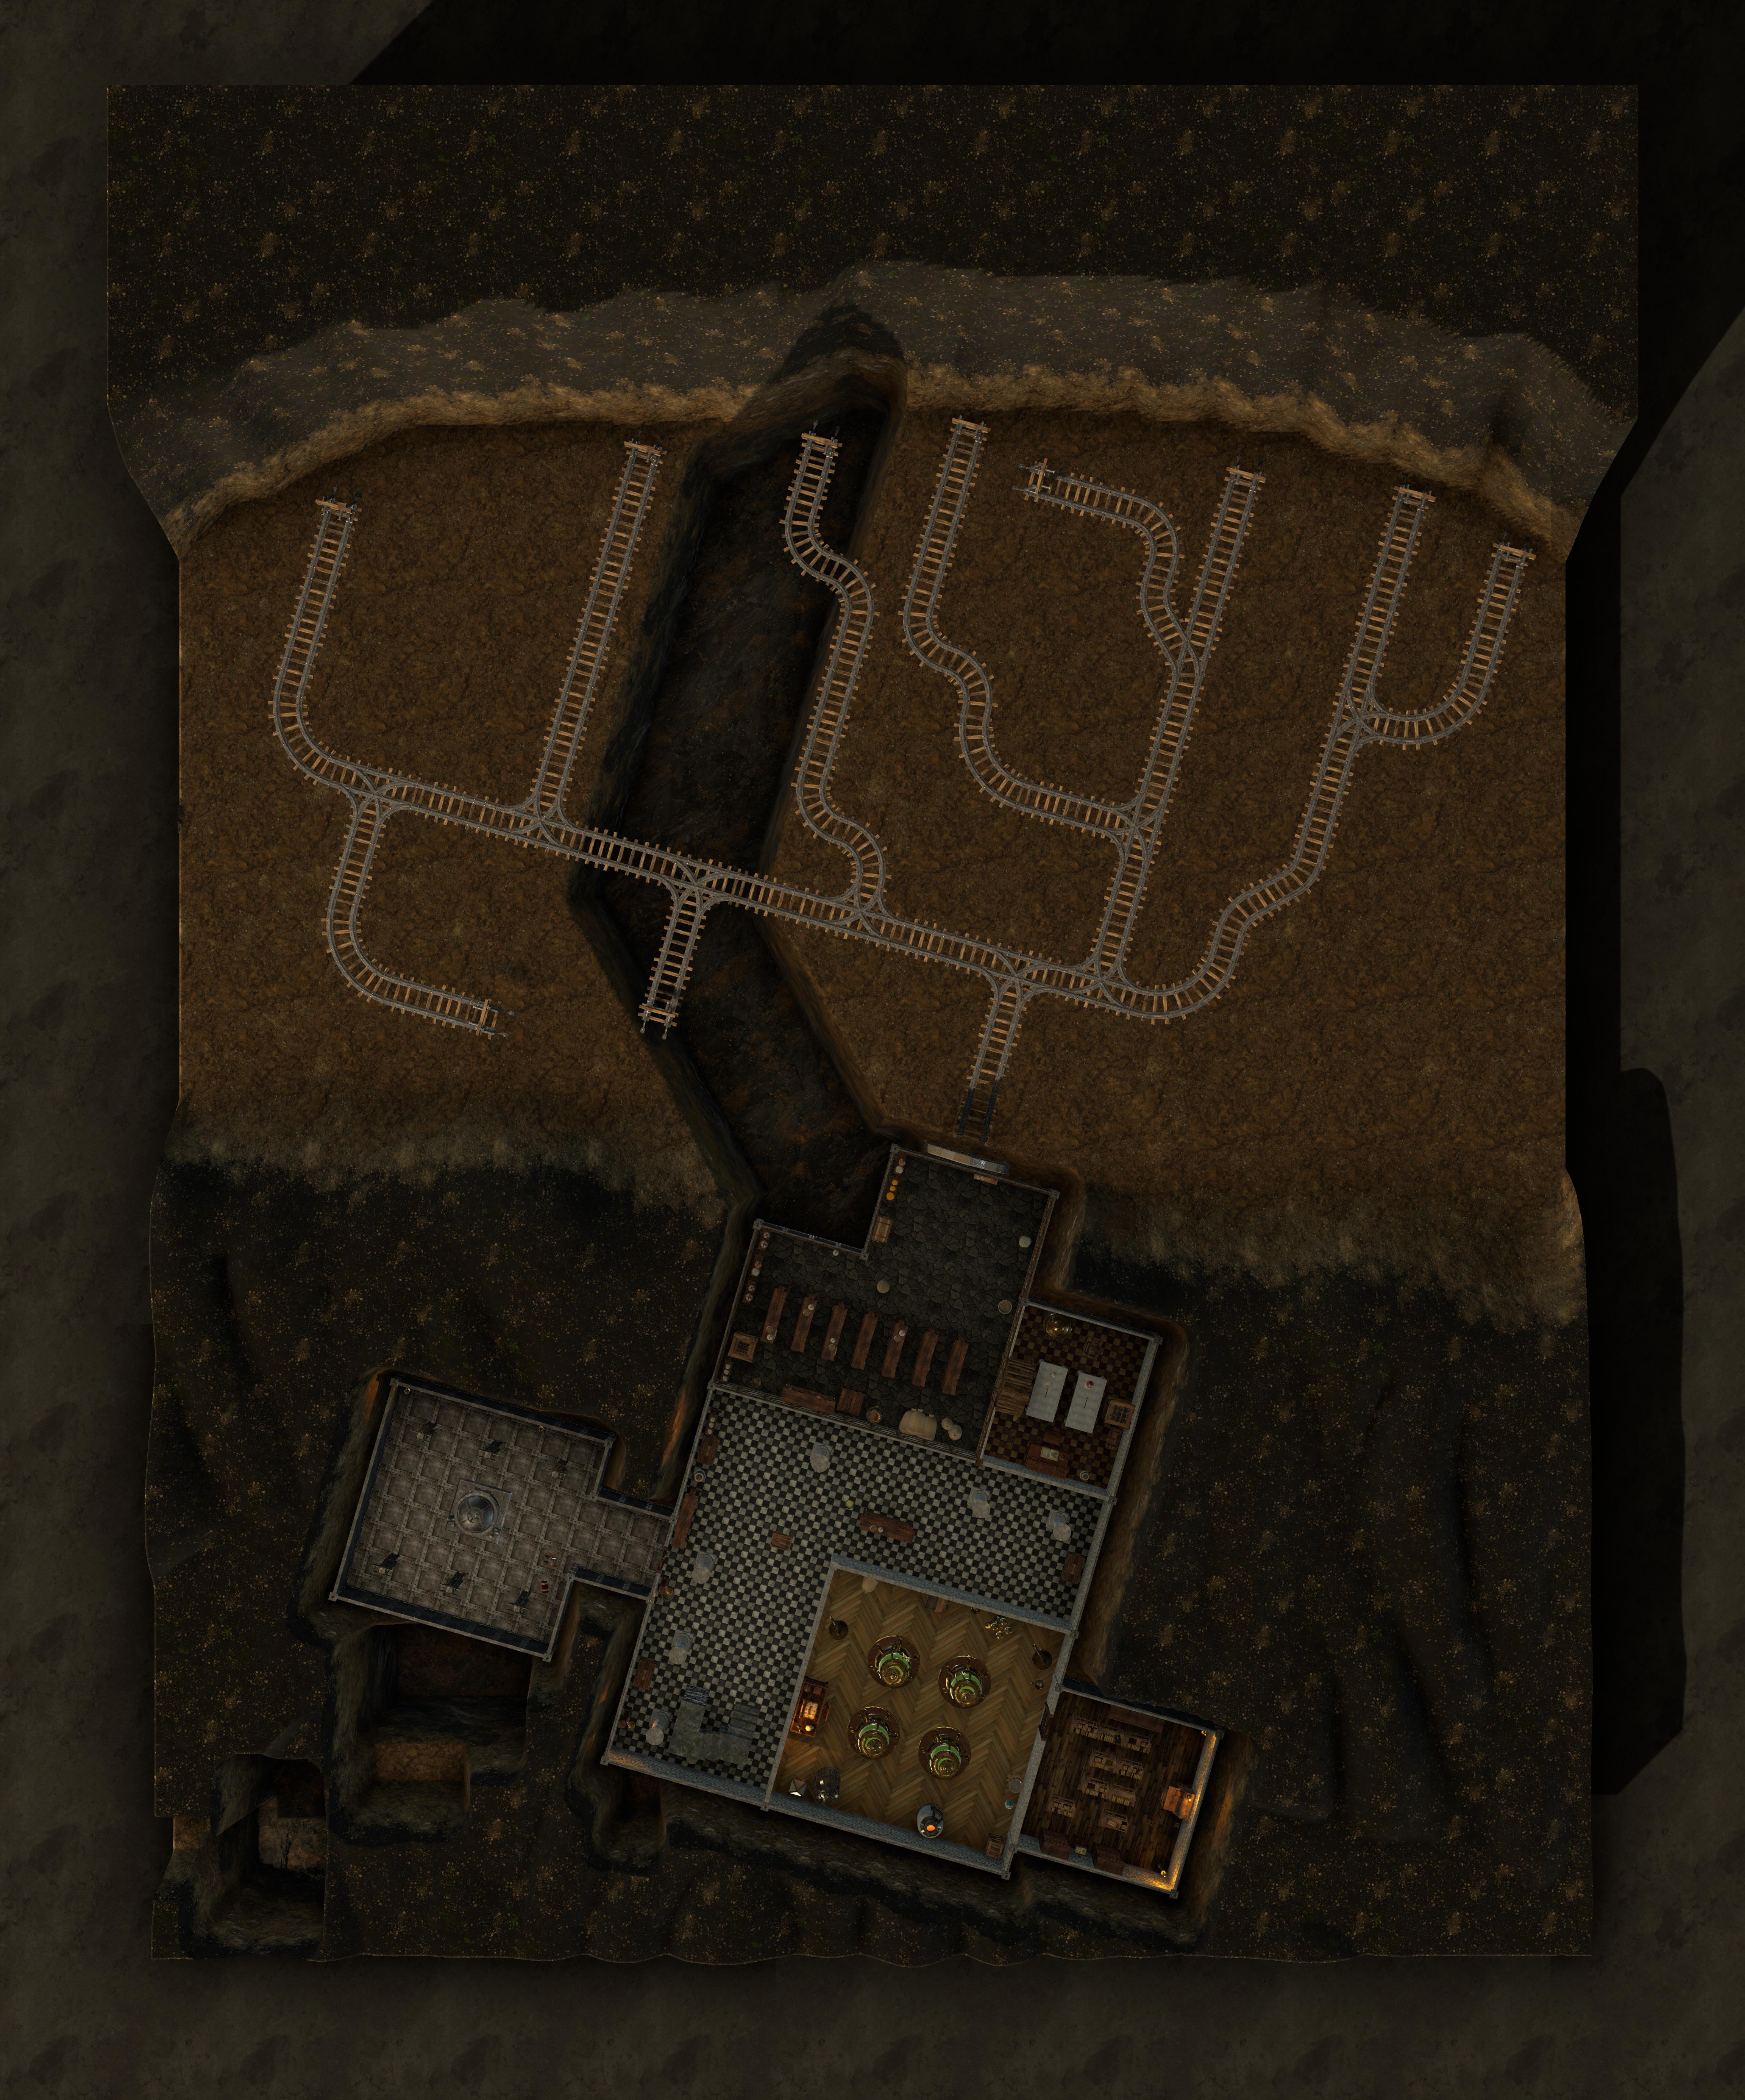
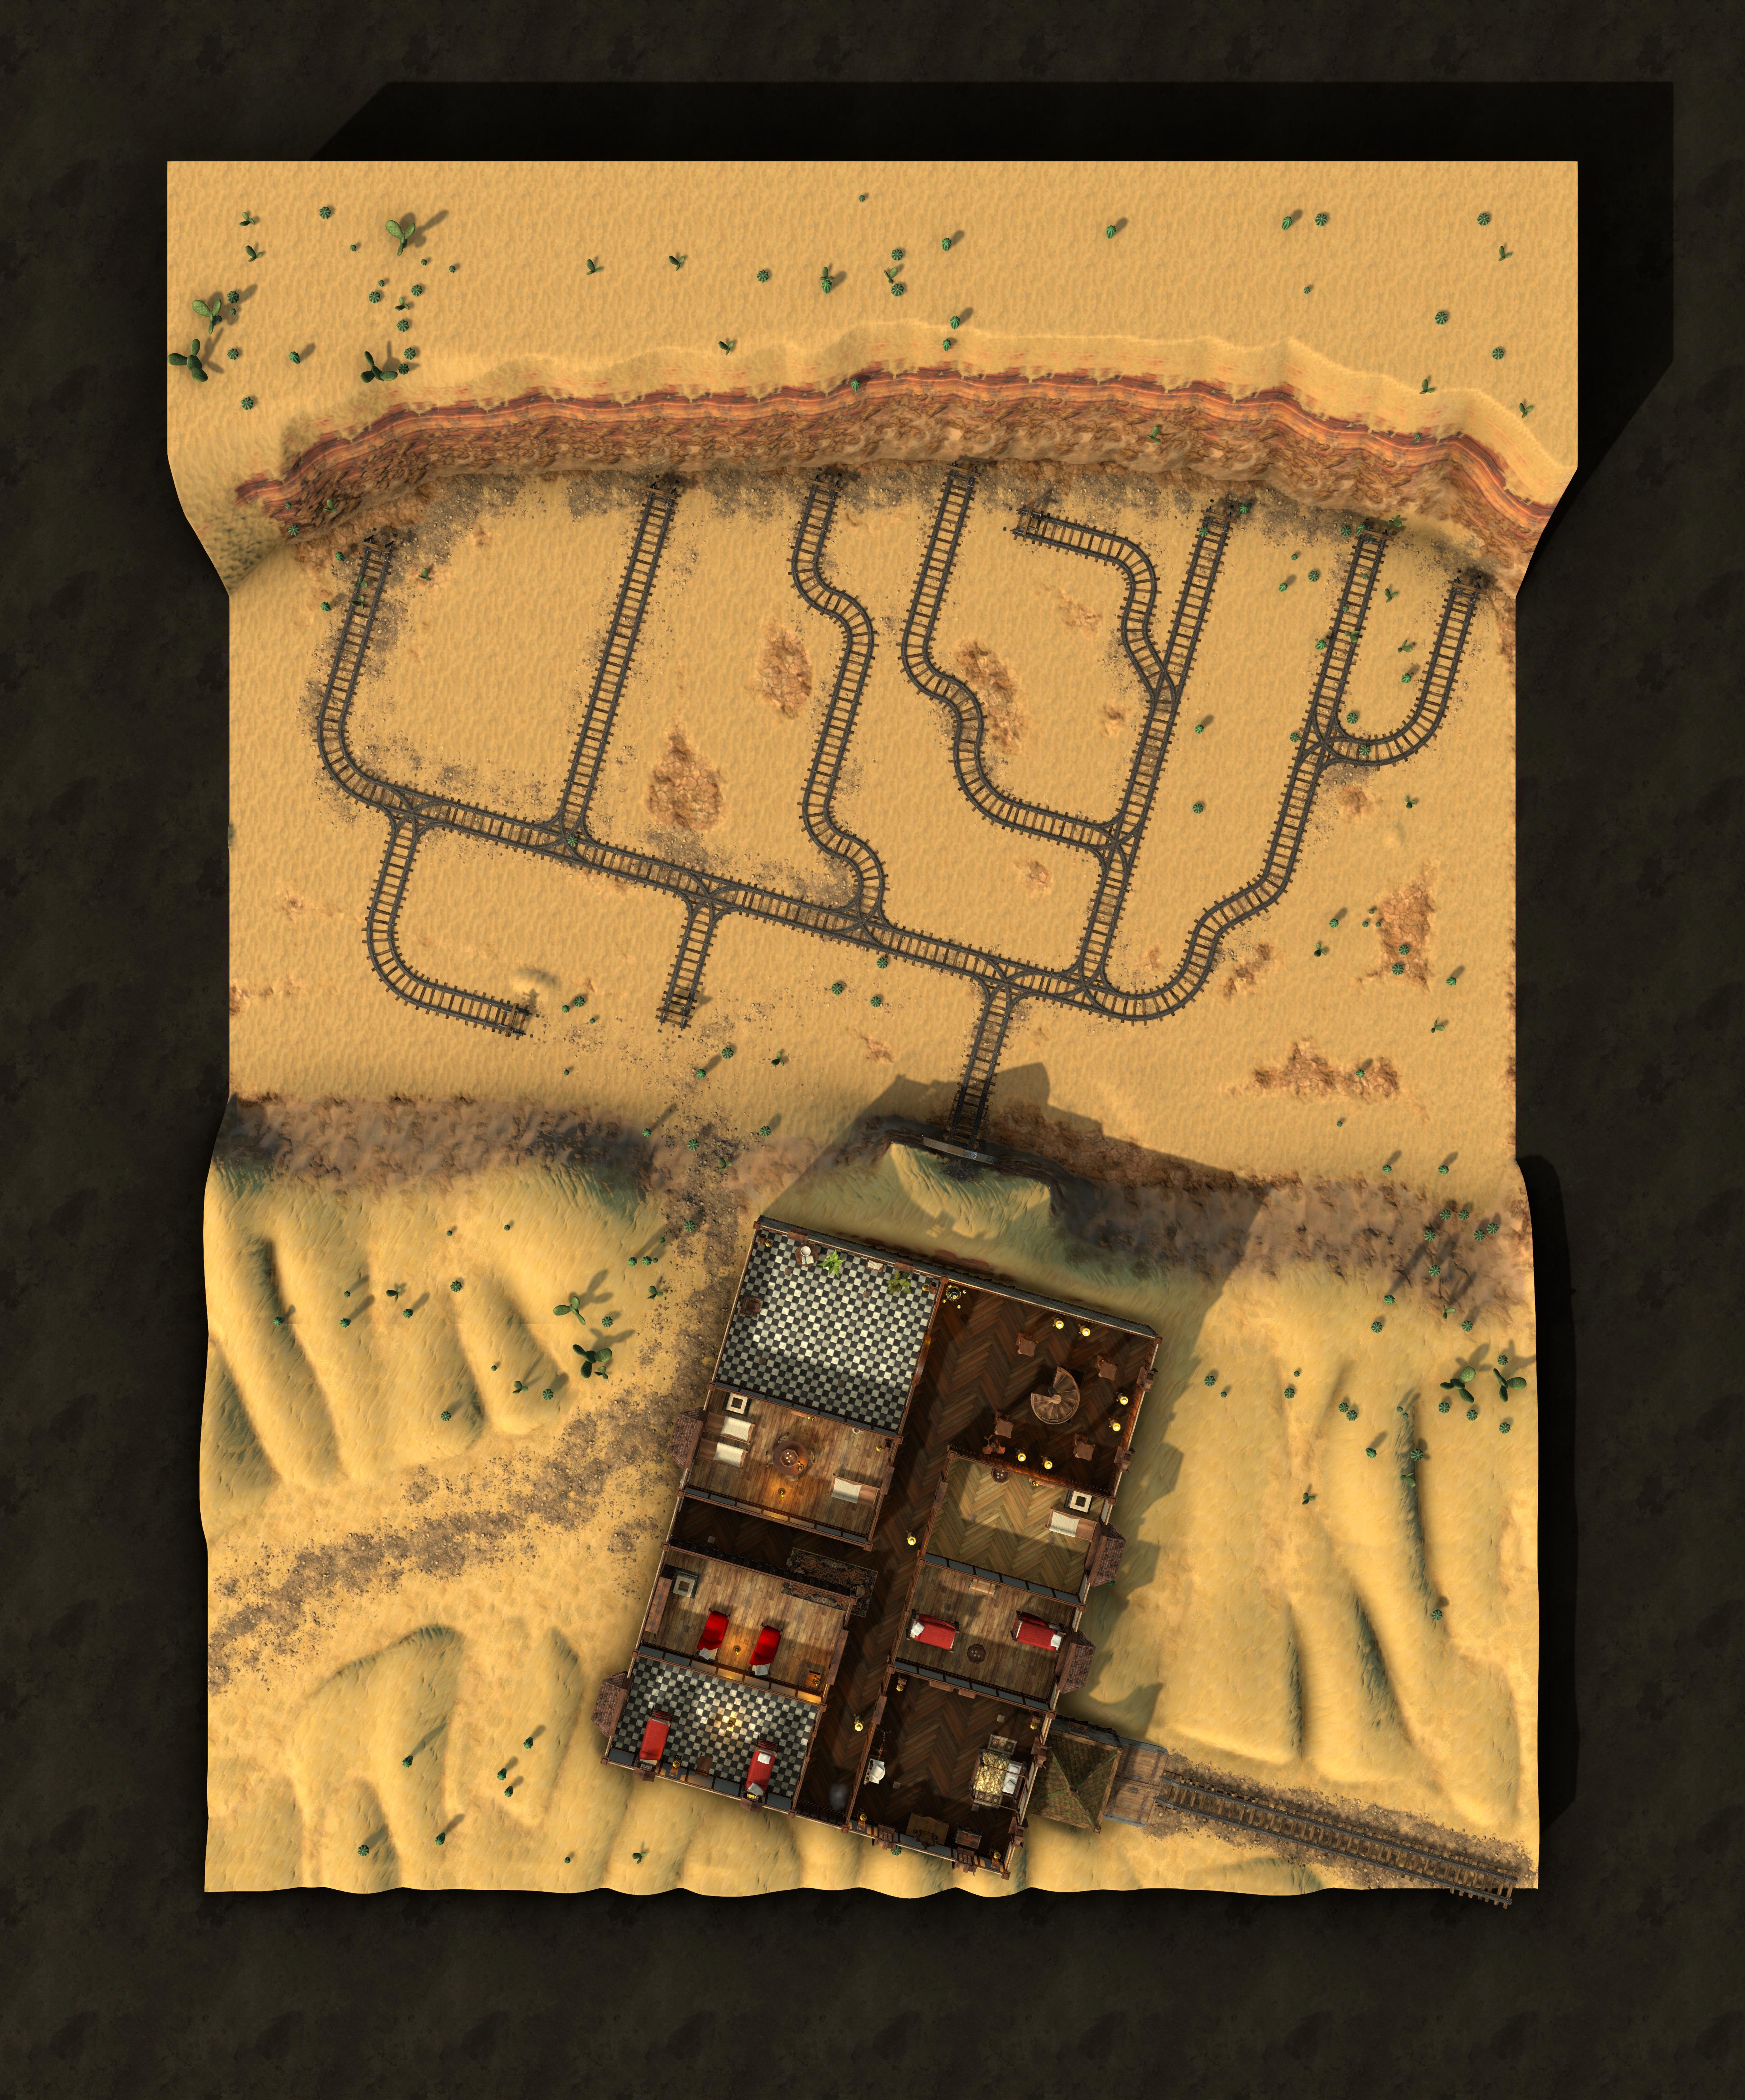
Ground Floor
Approaching the processing plant, the characters will find the place quiet, and the front gate wide open. Firelight is streaming out of the door, into the desert, but no sounds emerge from the wide open portal.A blaze of heat and light greet you as you pass through the heavy gate into what is obviously a well used workshop. Forges flank the entrance, with a row of heavy work benches in front of you. A set of stairs leads down, to your right, and a spiral stair leads up, to your left.
In front of each of the workbenches, a zombie sways in place, like a dizzy man doing his best to pretend he's not. Against the far wall, brandishing an ebony cane, a grinning man shouts, "Get them!" The zombies shuffle around uncertainly, turning to look questioningly at the black robed man. His face is tattooed with flames and swirling vortexes of fire, which would make him look fierce if he weren't so hilariously confused. "What are you looking at me for, you imbeciles? Attack them!" The four zombies make noises of understanding that sound suspiciously like "aaaahhhhhhhh", then turn and shuffle toward you to attack!
There are four Zombies, and an Etched Necromancer Acolyte waiting for the characters on the ground floor. The Acolyte has a +2 to his Initiative roll; the zombies will go last in the turn order.
First Floor Up
Climbing the spiral stair, you find yourself in a grand hallway floored in rare hardwood strips. A wooden sculpture graces one corner, and a corridor marches southwest through a heavy wooden arch. Bedroom doors line the corridor. A large lavatory leads off of the entrance hall.
The Overboss, an egotistical Etched Necromancer Deacon with two Zombie bodyguards, is in the last room on the left. It is his bedroom as well as his office, and he will admonish the characters for disturbing him when they find him. He will lull the party into conversation, and cast Command at sixth level, trying to affect the entire party with his order to "Grovel!" A successful DC15 Wisdom(Insight) check prior to his casting of the spell will reveal his nefarious intentions. Counterspell is also a valid option if available. Otherwise, the characters need to succeed on a DC14 Wisdom Saving Throw to avoid dropping to the ground and grovelling before the Overboss, who will gloat over any characters that fail their save.
Once all of that has been adjudicated, Roll for Initiative, with the necromancer getting a +3 bonus to his roll. The zombies will go last in Initiative.
Second Floor Down
Coming down the stairs you reach the final sub level, and find a fully stocked cellar storing all those things that are needful to run a house. To the right, an archway leads to an alchemical lab. To the northwest, a cold storage room preserves foodstuffs and barrels of fresh water. A small medical lab in the northeast corner of the basement hints at many injuries.
To the west, an explosives storage area lies mostly empty.
A DC13 Intelligence (Investigation) check of the Alchemy Lab will reveal a Potion of Healing in the desk drawer, and a hidden door that opens onto a small private library to the east. A DC15 Intelligence(Investigation) check will find the character uncovering a Manual of Gainful Exercise in the library, as well as a small chest with two hundred gold pieces in it. The characters will find a hidden door in the back of the cold storage room that opens on to an ancient tunnel that the Overboss was keeping secret.
First Floor Down
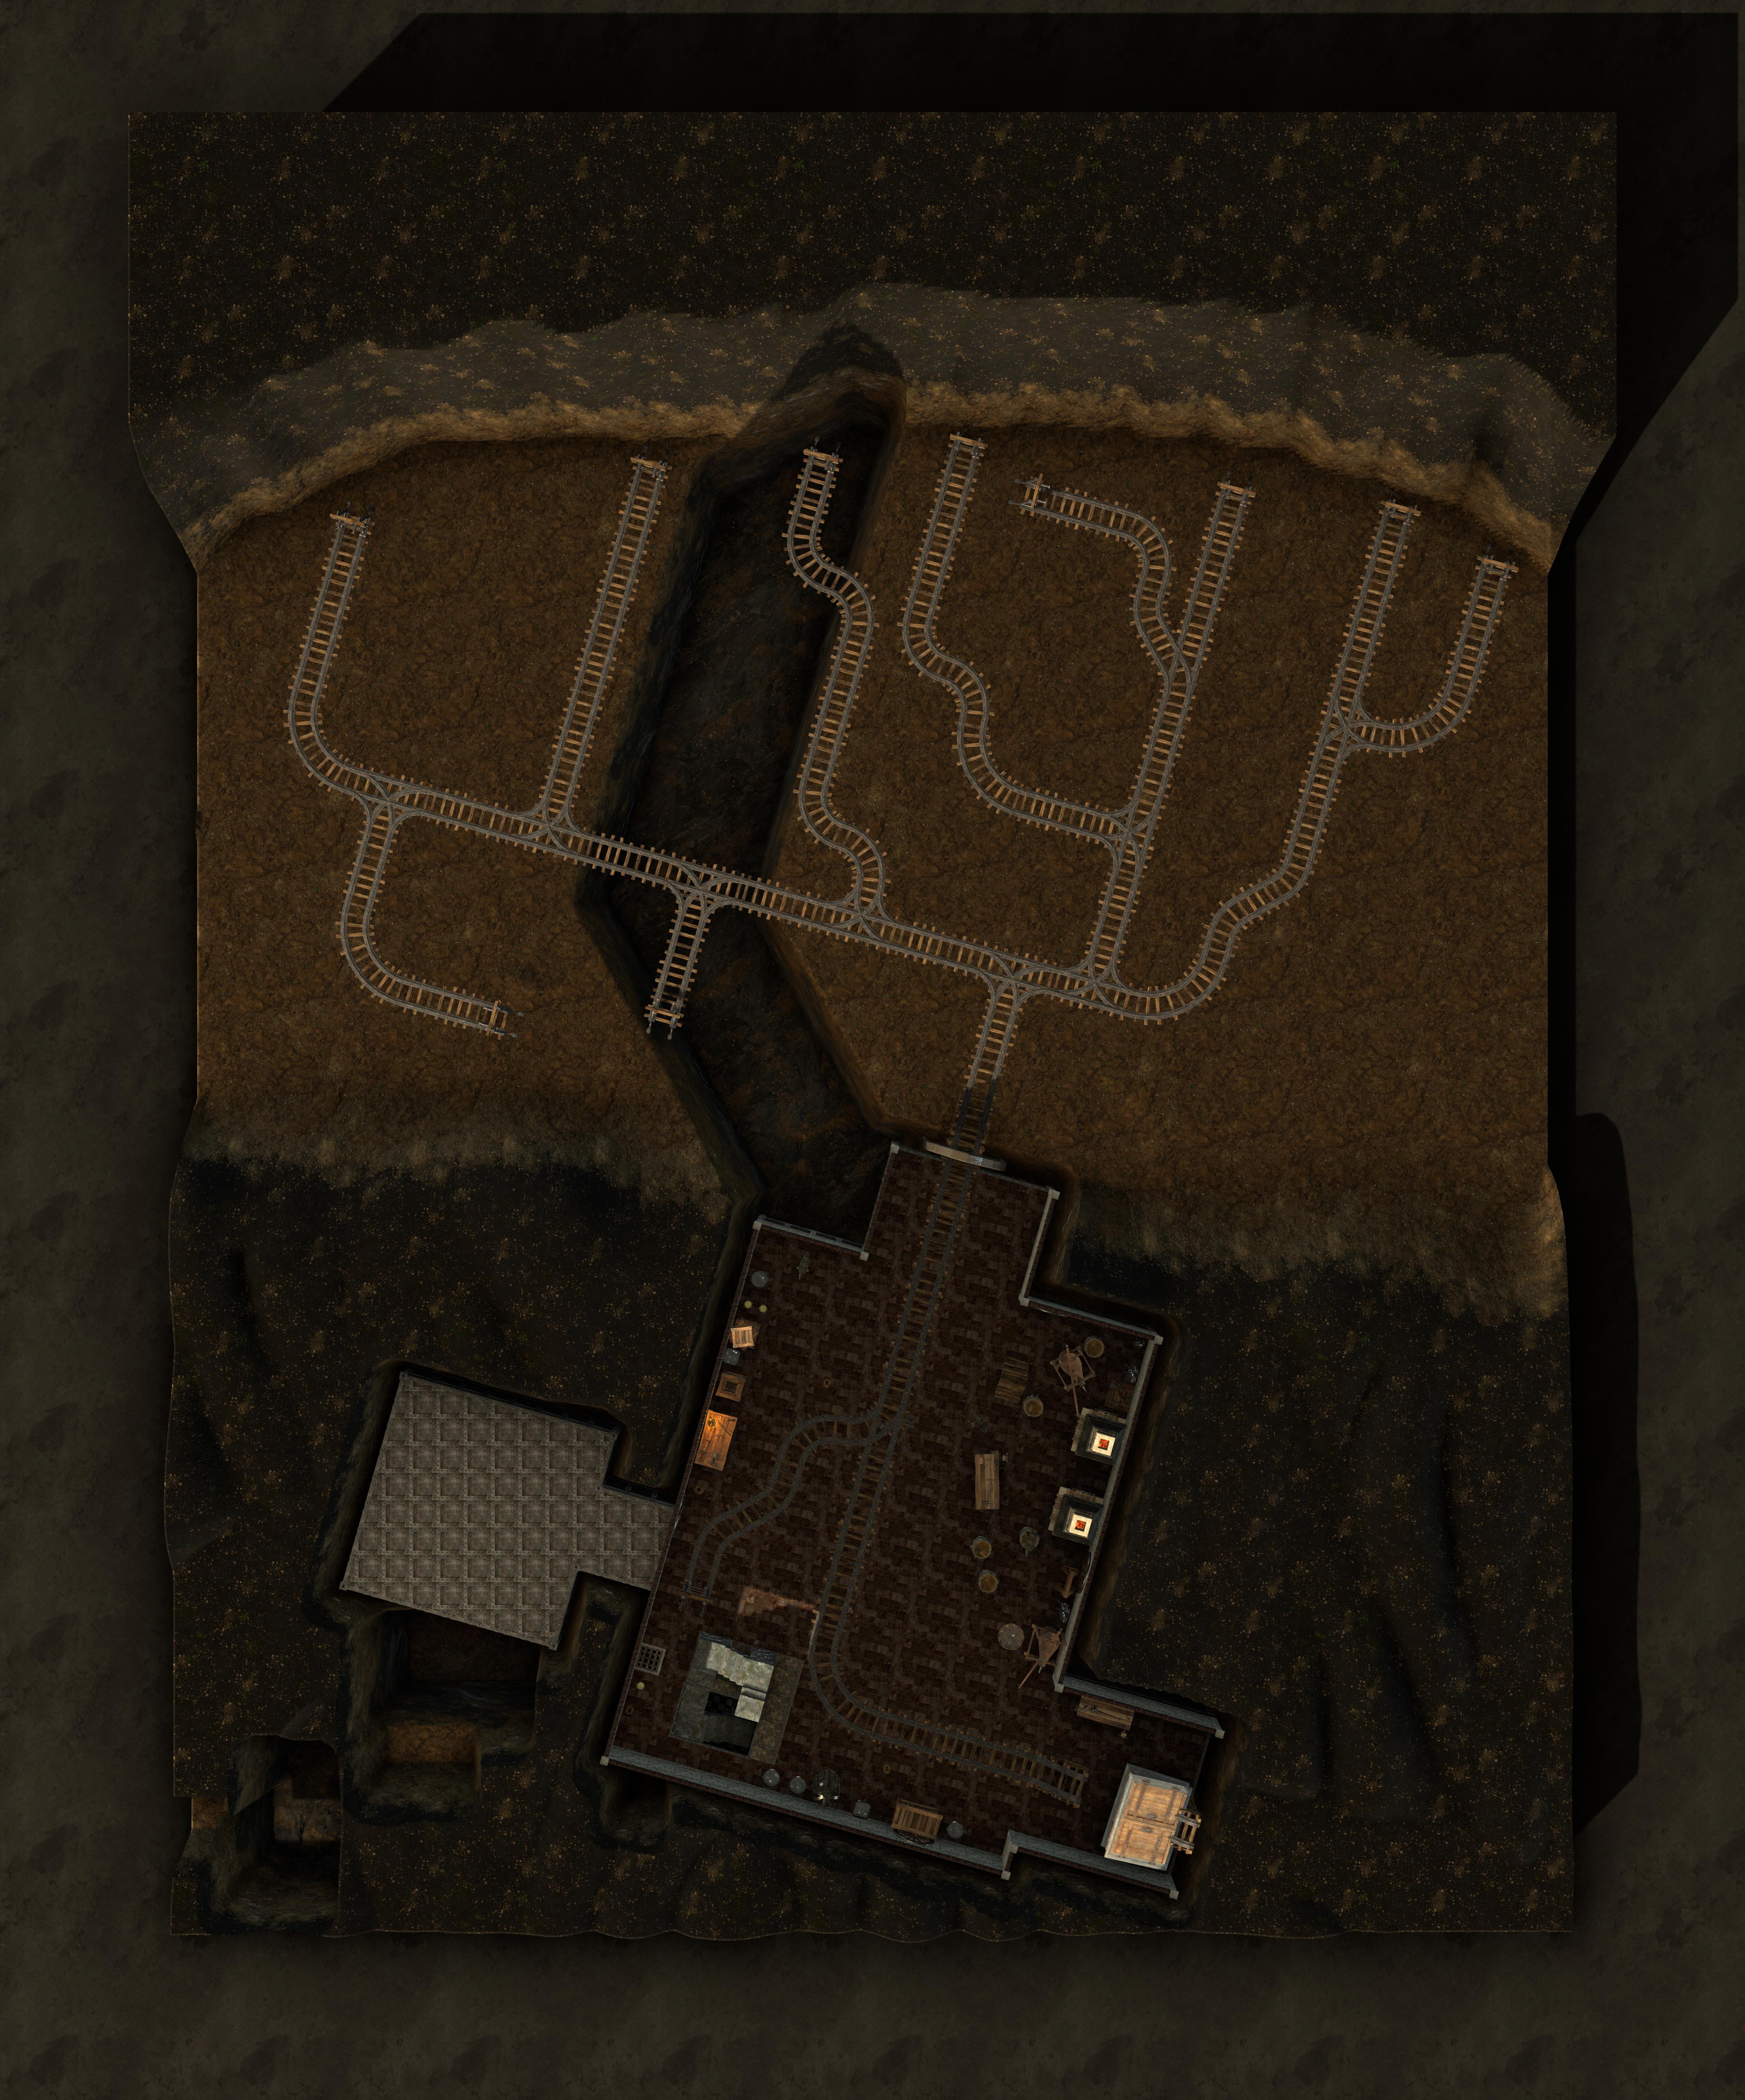
Descending the rough hewn stone stairs to the first basement is a surreal moment. You realize there is just as much of the mining operation happening below the surface as there is above the sand. Two forges are burning charcoal down here, where the floor is made of tiled sandstone. Two men are busy shovelling slag out of large bins into empty mine carts. Railway tracks lead directly into the basement from the mine, and out of the eastern side of the sub floor to cross the desert to the east. The two men notice you, and freeze, looks of pure surprise upon their faces. They lower their shovels in unison, look at each other, and gulp. The older looking one turns back to you, and asks, "Sooooo, can we break for lunch, yet, boss?" They are both grimey, with sweaty faces smudged with dirt. Wearing blue overalls and heavy workboots, they are the epitome of no-nonsense hard work.
Neither of these men are interested in a fight, but if the party starts one, the cultists will certainly defend themselves. They are both Etched Cultists, who are skilled metal workers from Rhôkairn in charge of steel production. The Ashsteel Commune pays them very well for their skills; and even better for their silence.
There is a newly-crafted Rod of Zombie Mastery on the workbench up against the northwestern wall of the first basement, and two more on the table over by the forges. If the characters decide to use this magic item to take control of the zombies in the mine, they will be trying to wrest control from the Etched Necromancer Acolytes currently giving the zombies orders. To do this, the characters must use an action to make a contested Intelligence(Arcana) Check with the Acolyte in control of the zombie in question. Once control of a zombie has been seized, it will remain under the characters' control for one hour, after which it will collapse into a pile of dust.

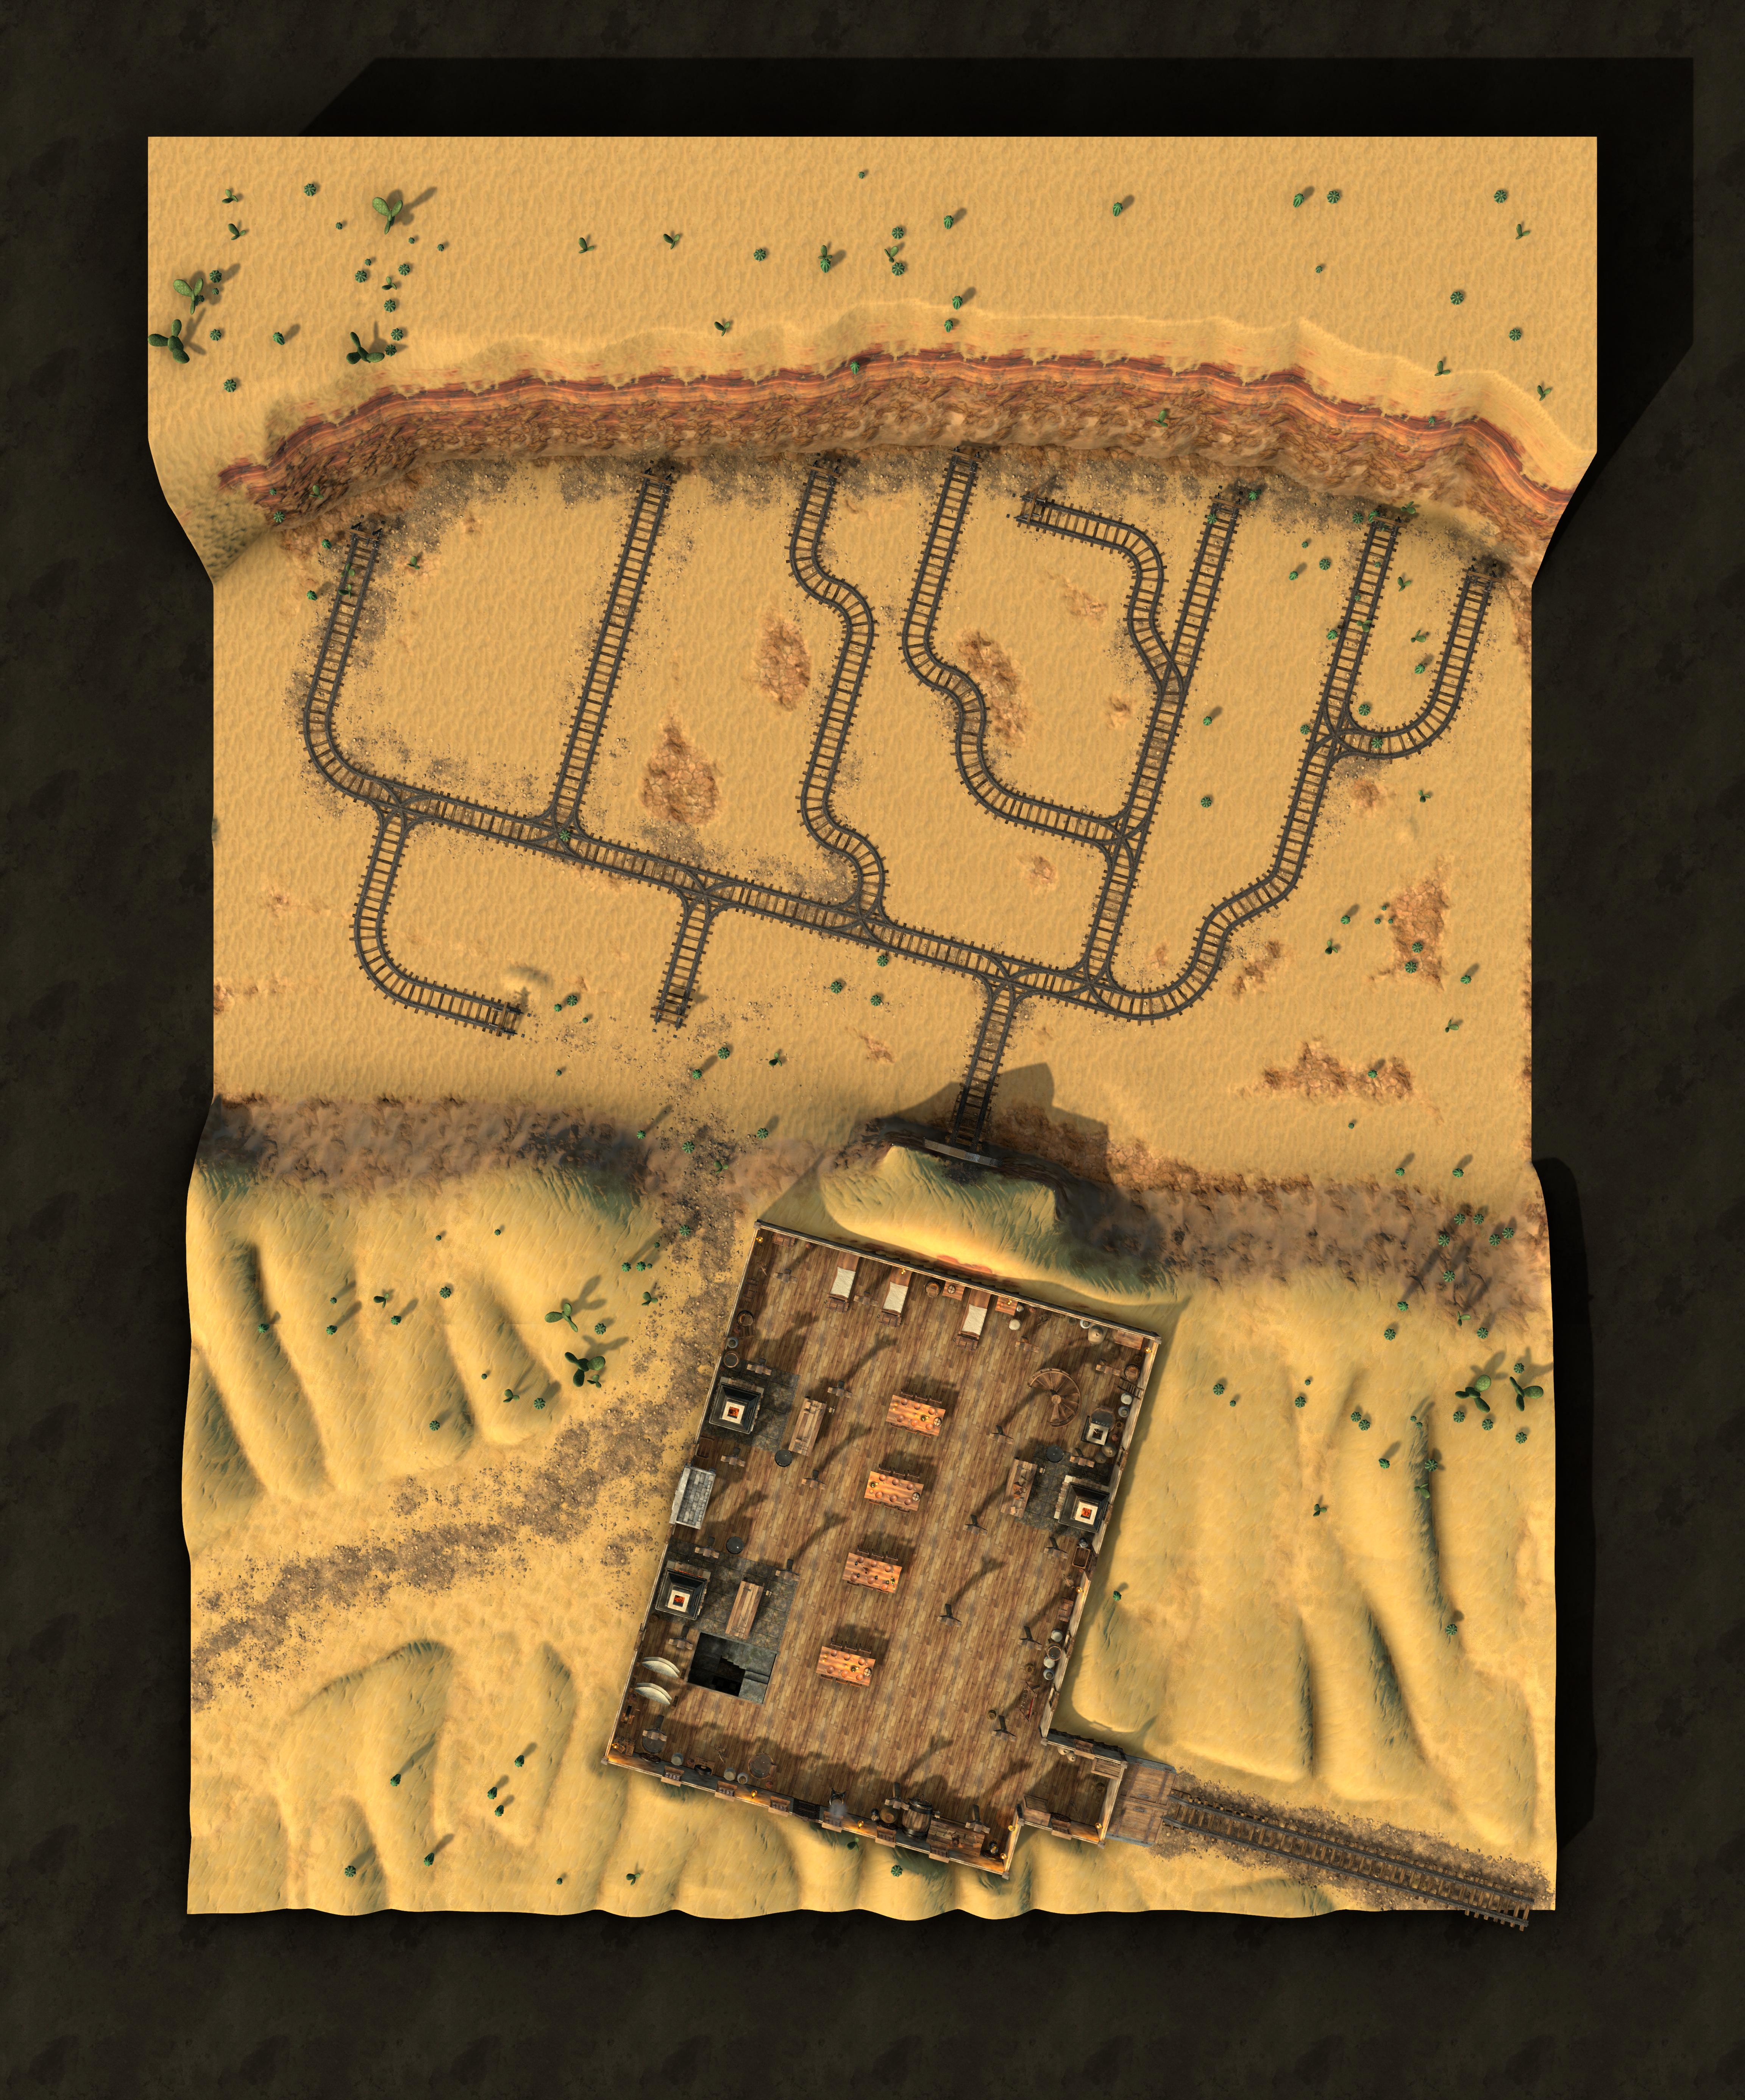
The Mine Scar
There are three Etched Necromancer Acolytes in the mine scar; there are also eight Zombies working on various tasks throughout the mine.
This is a perfect chance for the players to use tactics to their advantage; give them some time to plan.
Set up the battlemap with five of the zombies working along the far wall, the three necromancers near the processing plant door, and the last three zombies within sixty feet of the necromancers.
GM Note: GameplayThe necromancers will all start the encounter with Mage Armor. They will first attempt to either Command the spellcasters to Grovel, or Cause Fear on the healer, while ordering the zombies to surround and attack the fighters.

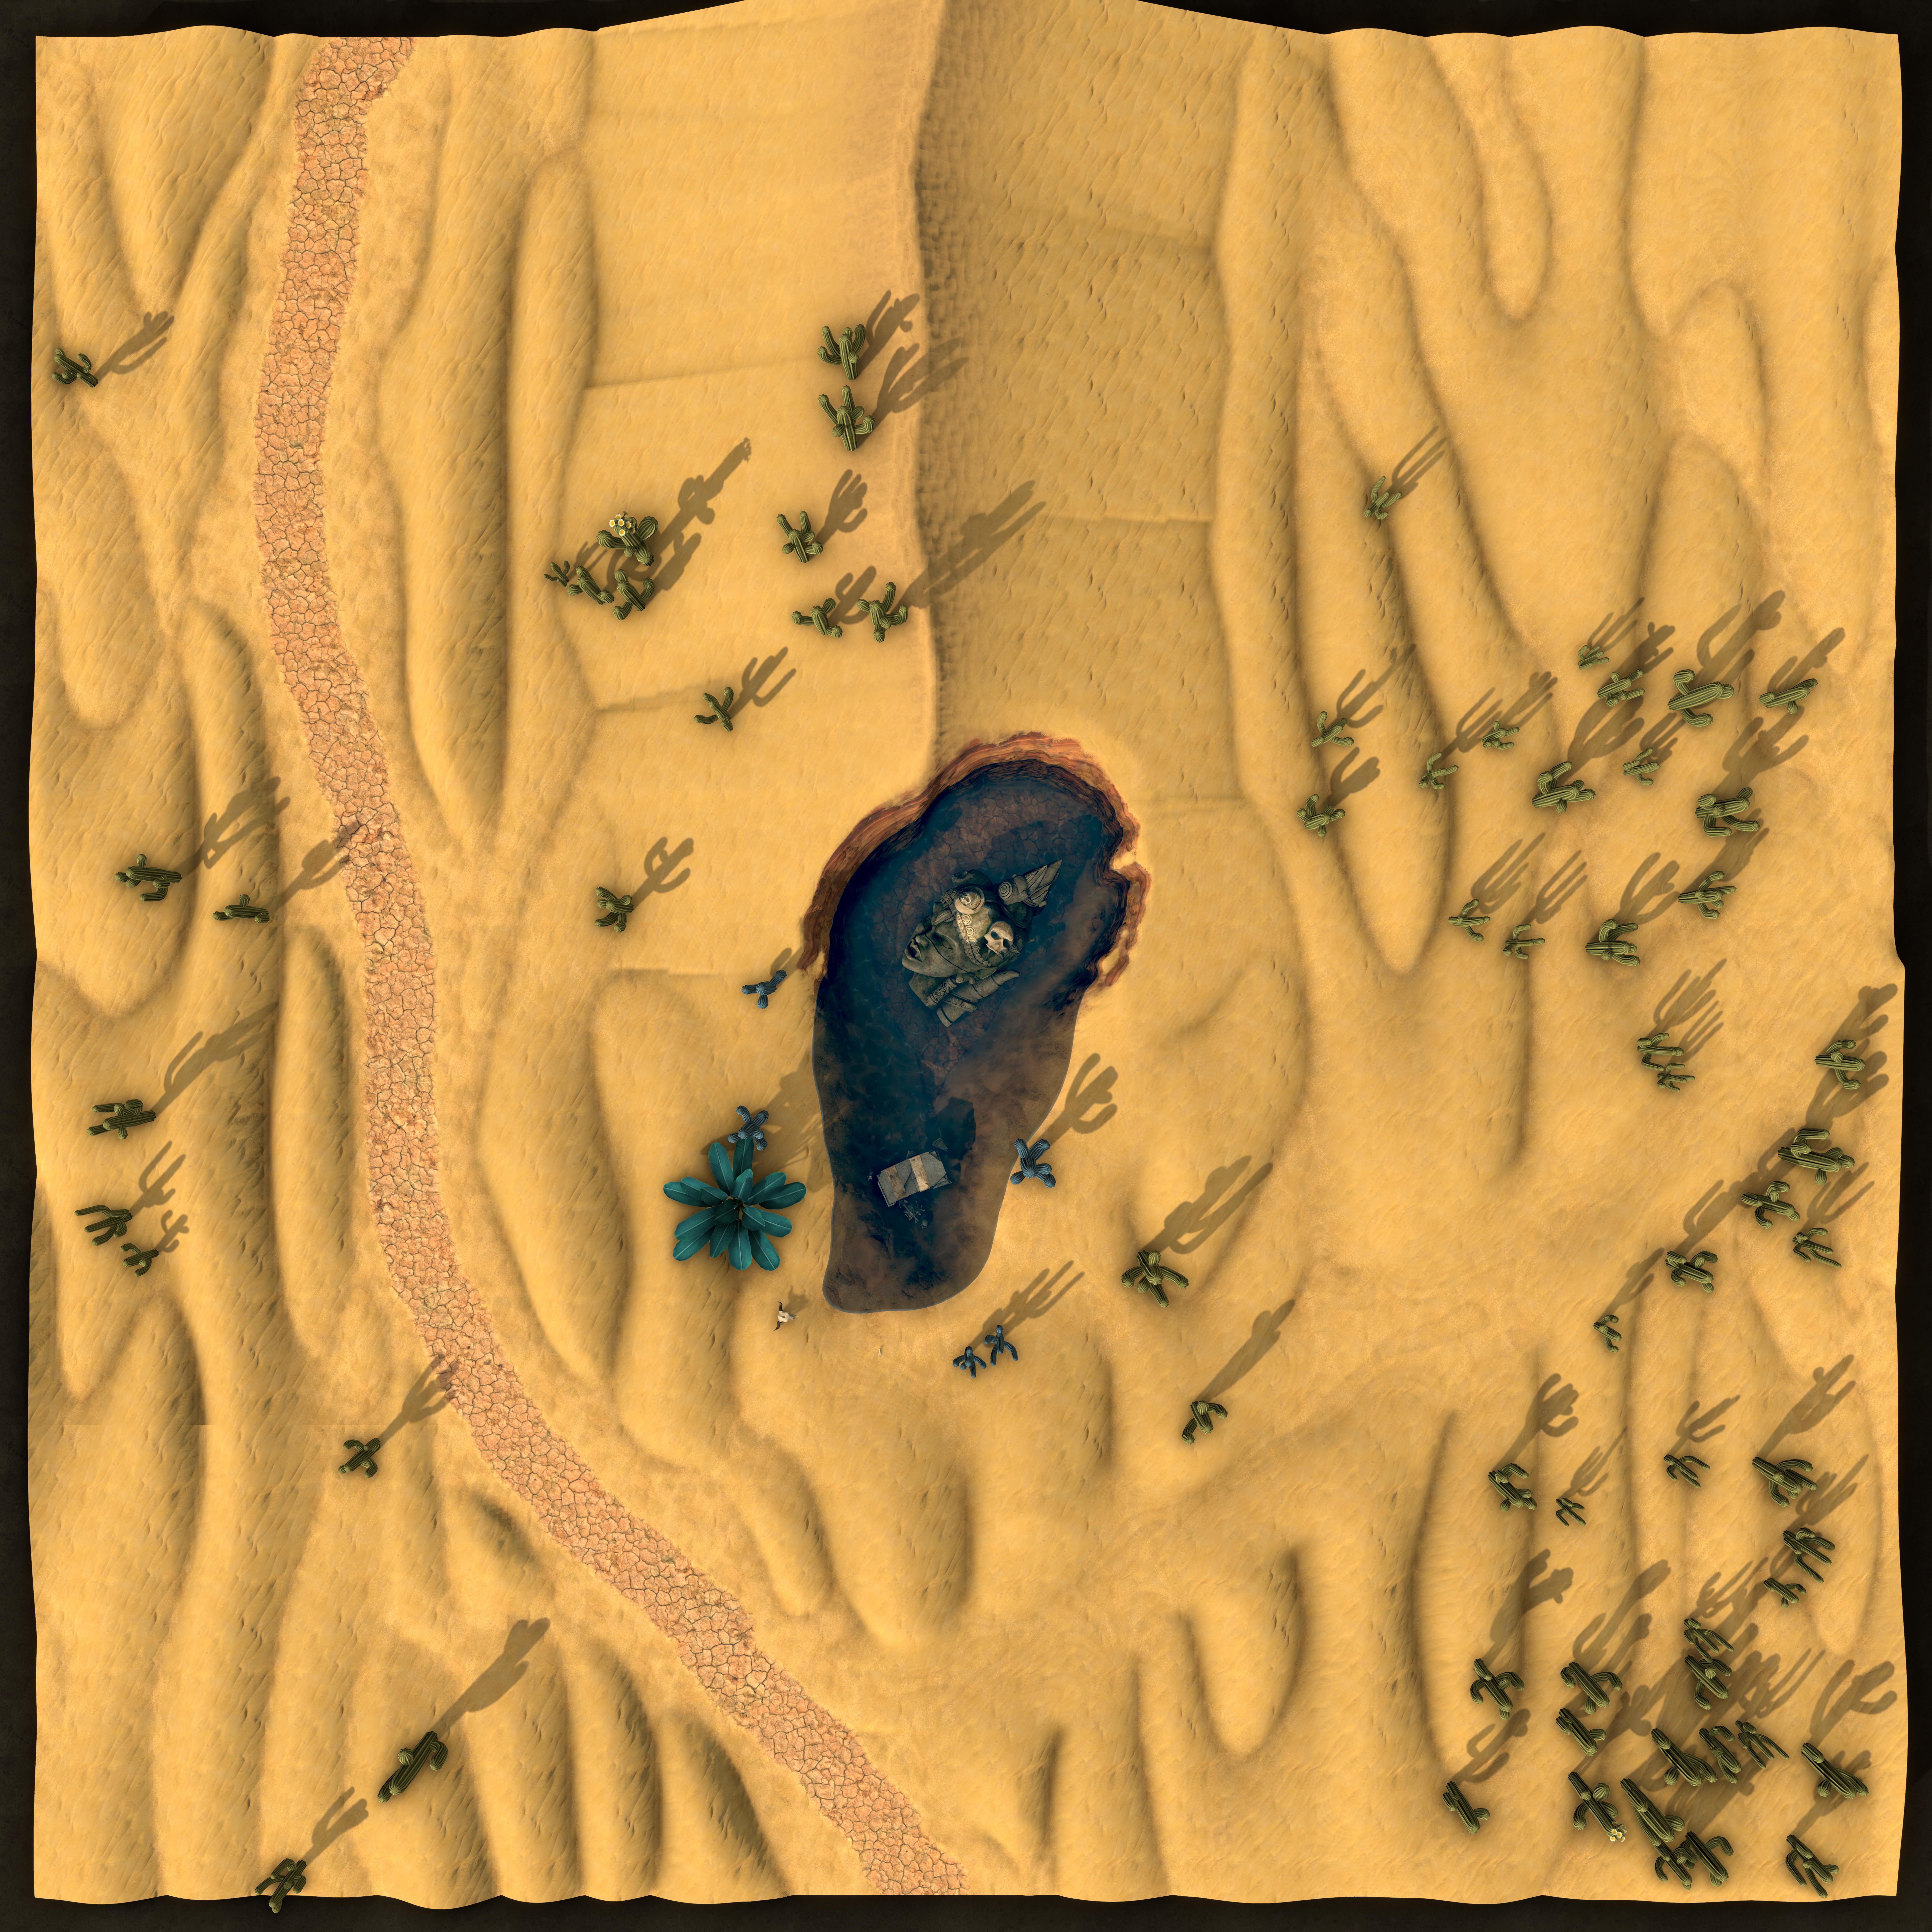
The Secret Spring
Following the ancient, hidden tunnel, will bring the party to the entrance to The Secret Spring.
Advancing down the surprinsingly ancient tunnel is a glimpse into the past; a look into the mind of workers who lived generations before you.
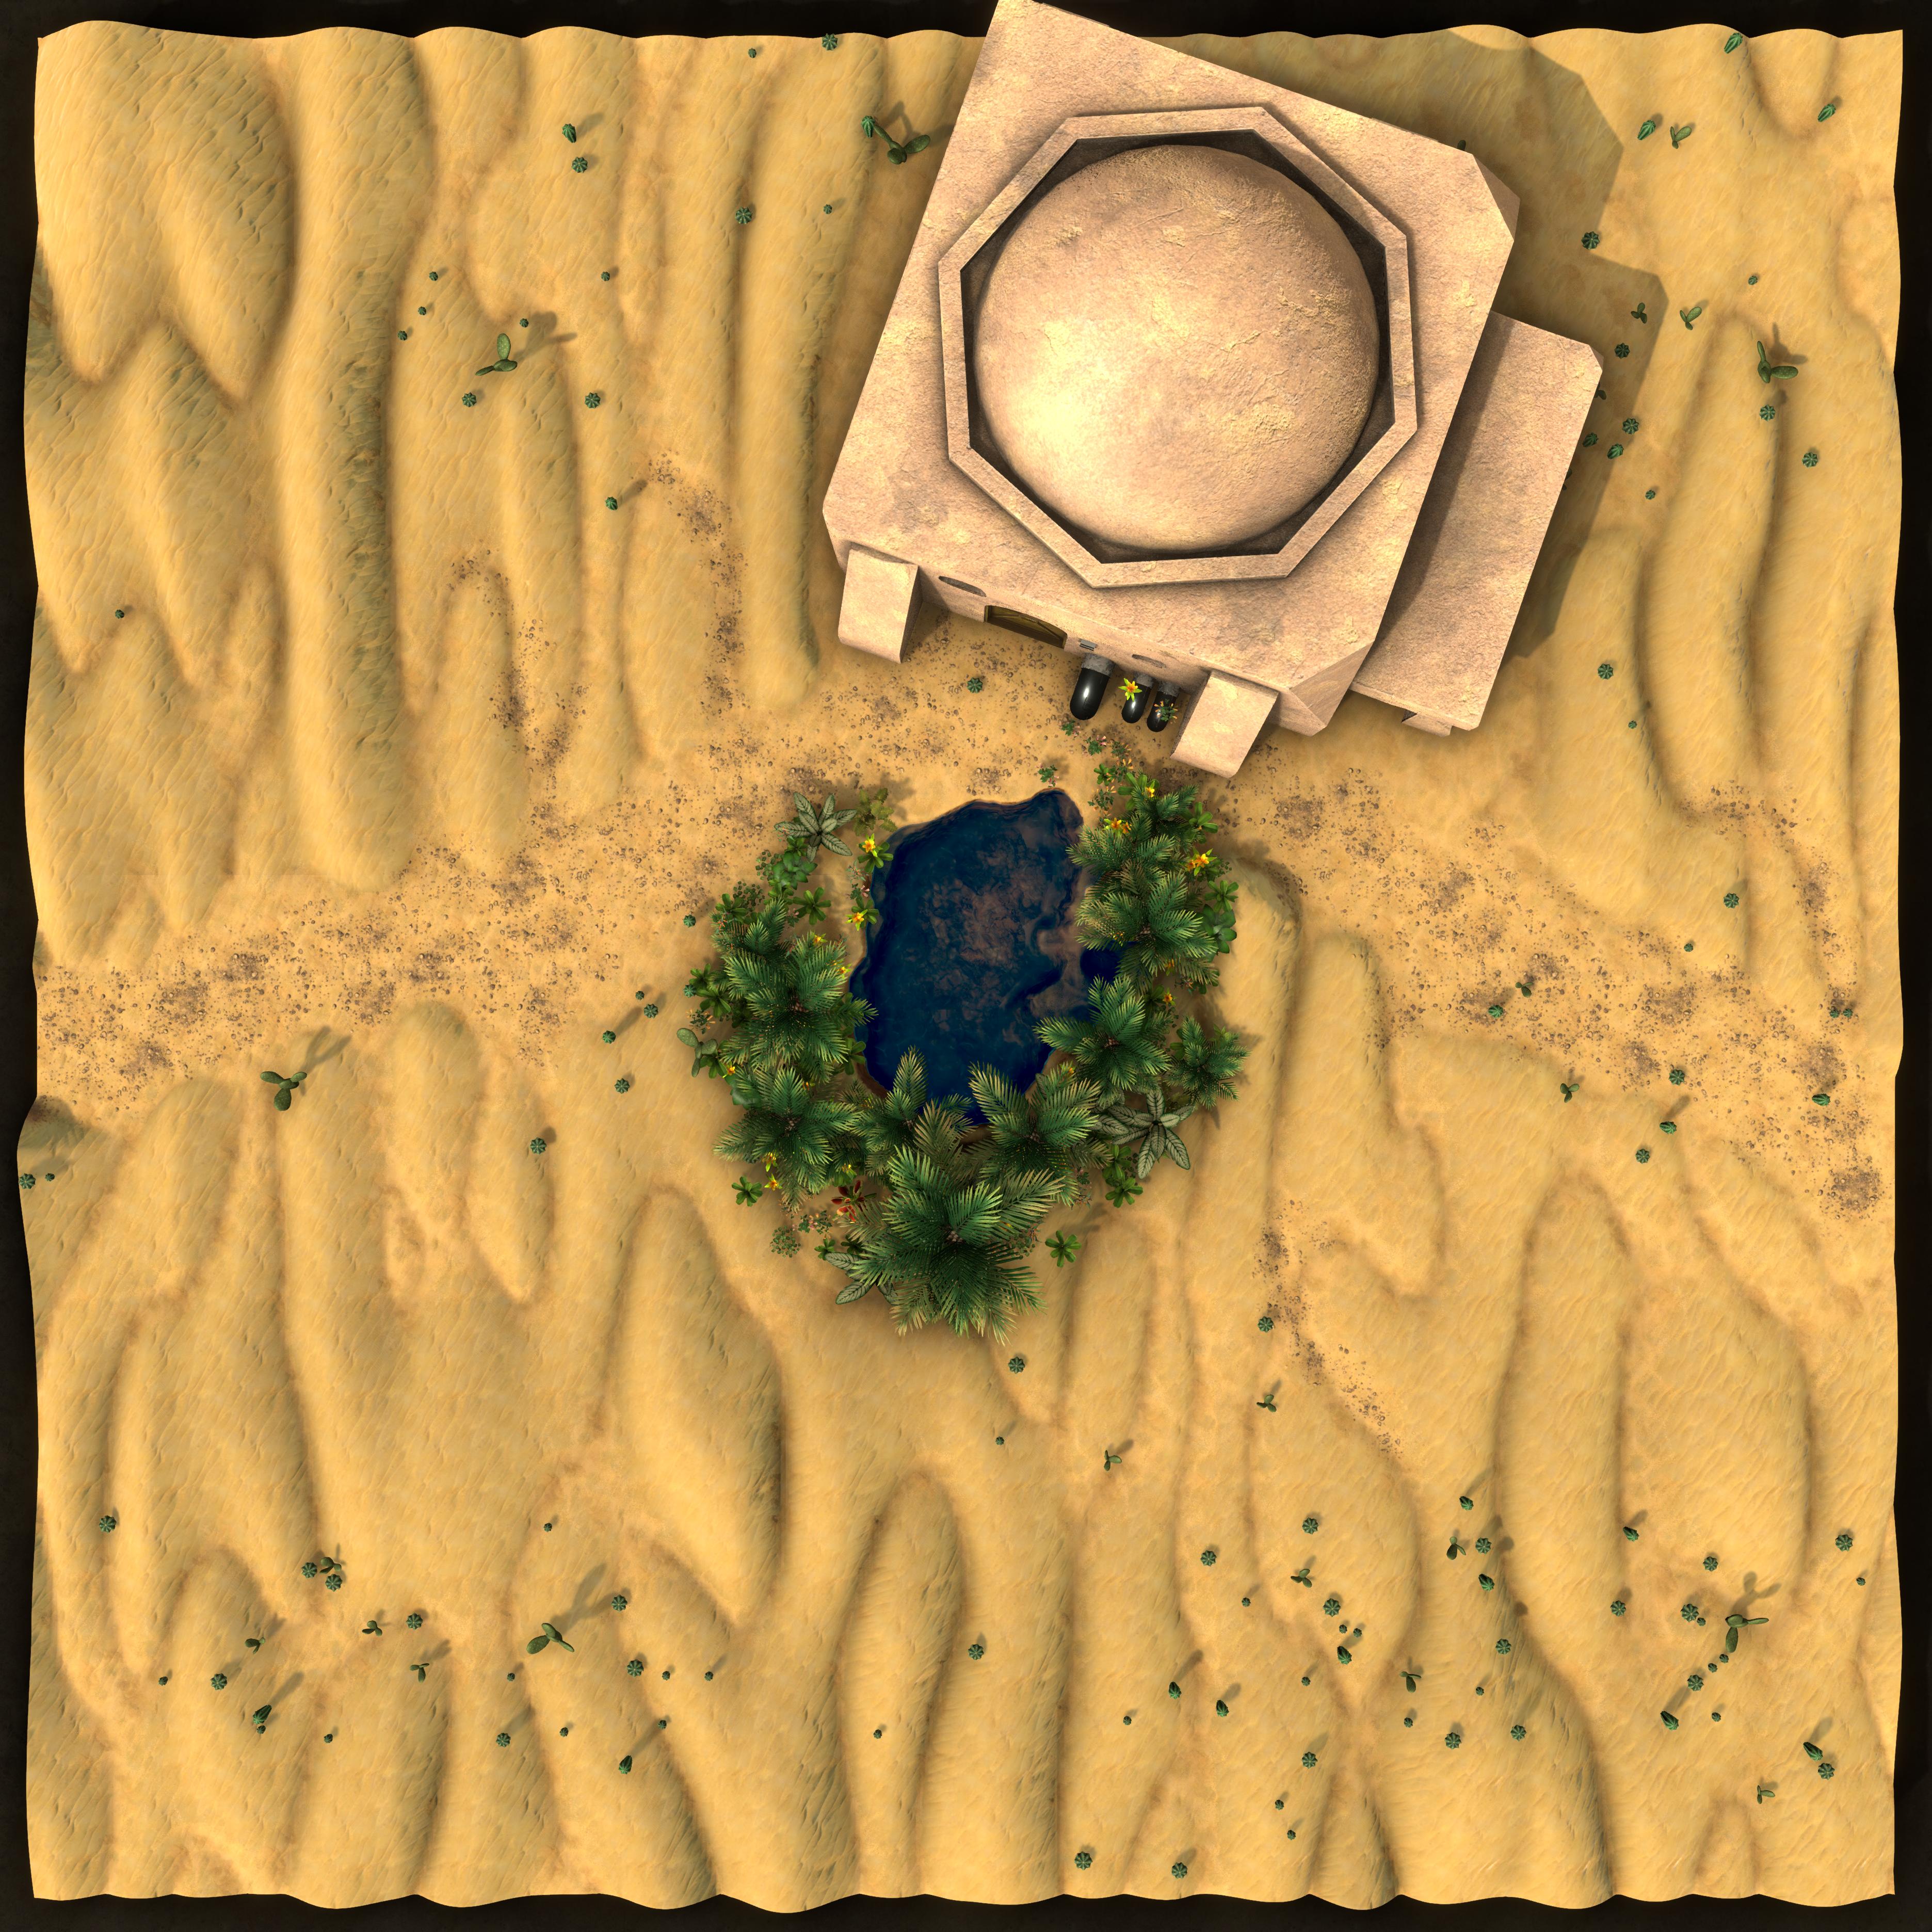
There are carvings on the wall; a bas relief record of the miners at work in this tunnel, below the level of the actual mine, and delving even deeper. The tunnel slopes slightly downward, and ends in a fissure in the wall that has been widened and smoothed to allow ease of access to what appears to be a temple beyond a long, curvy hall. The temple is made of ancient stone blocks, expertly fitted together without mortar. Pillars fill the back half of the room, holding up the roof. There is a spiral stair leading down in the middle of the temple's great room. It is made of stone, seemingly hand carved out of a massive central pillar.The central shaft descends one hundred feet, with antechambers every twenty feet. At the bottom, a passage heads to the northwest, to a nice little room with a well-built cistern in the center of it, and a massive circular hole punched through the far wall. On an altar, next to the cistern, is an old-fashioned oil lamp.
Falling Action
Once the mine has been cleared, silence will fall on the area. Then, the desert crickets and other insects of the night will begin their songs. Tentatively at first, but soon joined by hundreds of their brethren, the crickets will herald a new era around the mine.
But, now the characters need to think about getting back. They will want to report back to Professor Enberry, the surfer in Heaton Bluffs, for a proper debriefing, and to get paid. Should they follow the road, and go back through Toun? Where are their camels and gear? Do they need to go find their guide? These are all important questions.
The Journey Home
The seven night trip back to Heaton Bluffs should be a wind-down, but there are still chances for random encounters and unforseen adventures! Twice during each night of travel, Have a random player roll 1d10 . On a one, there will be an incident. Refer to the Desert Encounters table, in the Desert Travel article, to build out the encounter.
The travel time back to Heaton Bluffs is an important wind-down to the story, and a great time for spontaneous roleplaying. Reward especially good moments with Inspiration.
That being said, the players are going to want to turn in their report, and get their reward, so hurrying through it narratively is a perfectly viable option.
Resolution
Home
A gaggle of village children run out to greet you as you approach Heaton Bluffs, hooting and hollering unintelligibly. The road has gotten progressively shadier as the number of trees increases, and the salt breeze off of the sea has cooled the raging heat to a far more tolerable level. The adobe houses and shops of the village come in to view, and before you know it you are being greeted officially by the closest thing the little town has to a mayor; Professor Boyce Enberry himself.
They escort you to the home they have set aside for your use while you are in town, carrying baskets of dates and sliced pineapples. The younger folk bustle about getting the house tidied up, while the more mature crowd ensures you have enough food and water, and sees to your comfort. Before too long, everyone has hustled right on out of the now immaculately dusted and swept building, leaving you with a table full of food, a small cask of cold cucumber water, and some privacy. Professor Enberry asks you to come and see him on the beach when you are fully rested and ready, and then you are alone, feeling truly safe for the first time in a couple of weeks. You feel yourself relaxing muscles you hadn't realized were tight as you settle into your home in Heaton Bluffs.
The characters will be given two hundred fifty gold coins each, and Aeryn Cloaks made by the villagers out of local cotton. The cloaks are dyed in pastel layers, like the colors of a desert sunrise.
Turning in the quest to Professor Enberry will bring the characters to level five. Give the players some time to level up and build out their characters as they see fit.
And as this night fades, you realize with certainty that this part of your adventure is, officially, ended.

Comments