Cirvai's Garden
The Manor
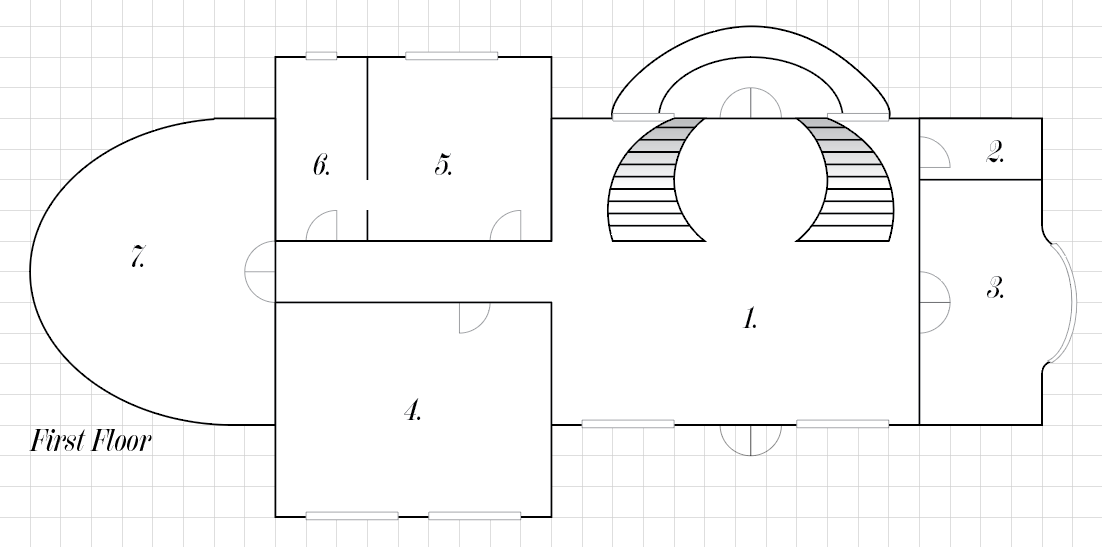
First Floor
1. Foyer
The entry into the manor is dark wood, gouged and scraped over many years of use. There are doors to the library and closet to the right, with a hallway to the rest of the main living areas to the left. Two large staircases lead up to the second floor, with moth-eaten red carpet runners that, at one point, were beautifully embroidered. A straight shot through the front doors to the back doors leads out to a large stone patio with fountains and statuery.
2. Closet
A small coat and cleaning closet with nothing of note.
3. Library
A library with built in bookcases and a large window seat. There is a fireplace against the far wall, with a silver box filled with sweet smelling petals and spices to throw into the flames and give the room a pleasant aroma.
4. Dining Room
A large wooden dining table with twelve chairs - five on each side and two on the end - sit. Each one is carved with imagery and symbols regarding the major gods of the pantheon. That is, Ausa, Bellatan, Doloros, Farahai, Felisis, Kanai, Nerovae, Politia, Silencia, and Zelentium are represented on the lengthwise chairs, with Grund and Kona-Karr represented at either head. Althjof, Rochambeau, Syria, Venebri, and the evil deities are not represented.
There is also a large china cabinet filled with dusty and broken crystal goblets and plates, with silver cutlery in the bottom drawers.
5. Kitchen
A large, open-concept kitchen with an island in the middle of it and a large window. There are plenty of cabinets to hold the cheaper glass, plate, and silverware, as well as an icebox and pantry that are full of long-rotted food and drink.
6. Breakfast Nook
With a half-wall separating it from the rest of the kitchen, the breakfast nook has a small, round table with room for six to sit around it comfortably. There are also two armchairs with a side table between them sitting near the door.
7. Sunroom
A strange combination of a bedroom and a sunroom, the room that once was Cirvai's main resting place includes a bed on a raised platform (though it is not a four-poster), a large wardrobe, a bathtub on a second platform big enough to sit three orcs comfortably, a fainting couch, and a dedicated bookcase. It is quite exposed, being made of glass on three sides, but one would assume that a dragon (particularly one that was as secluded as Cirvai was to begin with) is not so concerned with privacy.
Jacob and the wyrmlings sleep here.
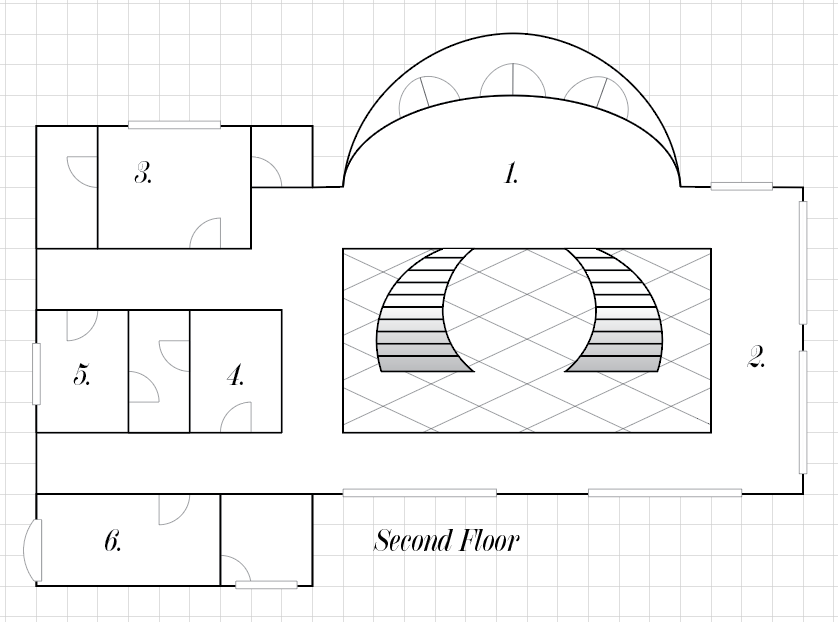
Second Floor
1. Landing
Climbing up either of the staircases leads to a semi-crescent area with a very out-of-tune grand piano. It is painted white, but the paint has far since peeled away. There are other places - sofas and chairs - turned to face the piano as someone gives concert. Hooks on the wall speak to, perhaps, other instruments once being housed here. Beyond are three pairs of French doors with intricate scroll work that lets out onto a balcony overlooking the patio below. Perhaps there was once furniture set out here to enjoy the space, but beyond one singular stone bench at the apex of the balcony it is barren, with only leaves and little stones scattered across the ground.
2. Belvedere
Four large windows look out onto the grounds, and it is clear that that this area is merely meant to be enjoyed for the view across the gardens themselves. There are two chairs with a side table in between them on the western-most side, but there is nothing else but a few long-dead potted plants decorating the interior rails and corners of the belvedere.
3. The Oak Room
Paneled with warm oak wood, the oak room is the largest bedroom on the second floor. The window directly opposite the door is actually a set of French doors that can be opened to let in sunlight and the breeze, but there is nothing but a railing beyond (that is, it has no private balcony). To the right of the entrance is a walk-in closet, and to the left is a private bathroom with a bathtub and vanity. The vanity even has a rune marked upon it that, when touched, activates the small gemstones studded into the frame to blaze with light.
It also has a large wardrobe, armchair, and coffee table on the north side of the room (the bed is located on the southernmost wall, directly to your left as you walk in).
Thais sleeps here.
4. The Seafoam Room
Painted a light teal color, the "seafoam room" is decorated with little trinkets from the oceanside. It is not a tropical room, but simply has a four poster bed, a small armoire, and an open bookcase that is clearly a set with the bed frame (it is also a four-post style with shelves suspended at intervals until just below the ceiling). There is a small bottle of sand and a large conch shell on the second-to-highest shelf, but beyond that and the color of the walls there is no kitschy theming to this room.
It has a Jack-and-Jill Bathroom setup with the fern room.
Micaiah sleeps here.
5. The Fern Room
So called by the party when they found the skeleton of a large fern that scraped the ceiling of the small room, the "fern room" has only a large bed beneath the window and a chest of drawers opposite the door. It shares a Jack-and-Jill Bathroom setup with the seafoam room.
Olena sleeps here.
6. The Unfinished Room
With only a pile of blankets in the corner and the wooden floor half-installed, either Cirvai became too sick, too distracted, or otherwise was unable to complete this room. Perhaps she wasn't even the one working on it and her mortal neighbors simply left before it was completed. Whatever the case, it is a shelter from the elements and not much else.
At least the ensuite bathroom is finished, and has a bathtub with a large waterspout overhead that, upon pulling a lever, will cast create or destroy water (in this case, creating it) through the waterspout in a fantasy approximation of a waterfall shower. It is warm (not hot) water, however, and has no ability to have the temperature adjusted.
Foenix sleeps here.
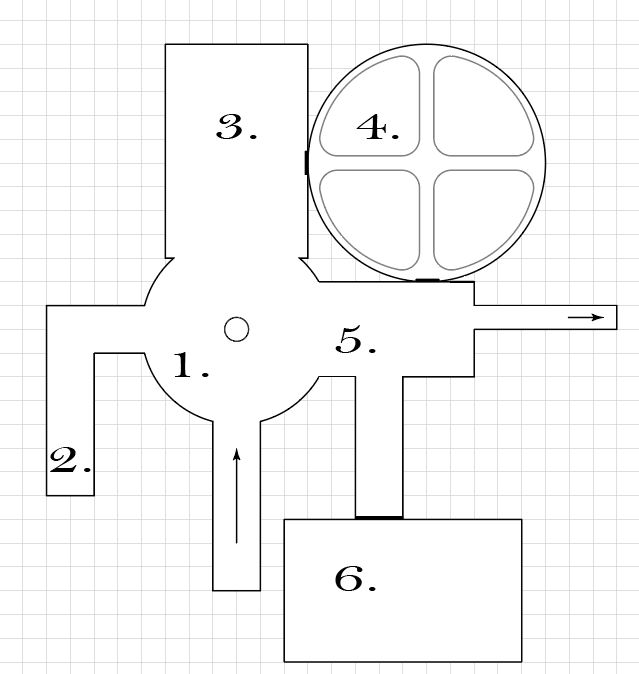
The Sanctum
1. Well Room
The staircase leads down into a circular main room with a 5 x 5 ft. well, with three doorways in the cardinal directions. To the west, a hallway to the library. North, the shrine to Kona-Karr. East, the storage room.
2. Library
A passageway that ends in a small library, with books, a chair, and a desk.
There is also a secret door here that reveals a tunnel leading back to the main living quarters.
3. Shrine
A shrine to Kona-Karr, with a rock garden and hardy plants nestled into the rocks.
A statue of the woman herself: human with long hair braided in two ropes over her shoulders. She wears leather sandals, a cloak, and carries branches of ripe berries, white rabbit furs, and fresh flowers on a leather belt about her waist. She holds out one hand with a soft smile, offering a sprig of... something. It looks like it was once an actual plant, but time has dried it out and crumbled it to dust.
There is an inscription below her feet, reading, “I gift you what heals all.”
There are twelve pots, each housing a different herb: echinacea, chamomile, sage, garlic, ginger, peppermint, lavender, rosemary, thyme, turmeric, cilantro, and basil. These herbs can be picked or trimmed.
4. Garden
The large interior garden. It has two wooden doors, one leading to 5 and one leading to 3. An underground river flows underneath the four quadrants, irrigating the subterrestrial plants that are grown here.
The west door is blocked by overgrown mushrooms block progress and must be hacked down. There is a MASSIVE violet fungus (three of them, to be exact) growth hidden here. There is also a cavelight moss growth on the ceiling and a death butterfly swarm.
5. Storage
A large storage room full of mundane supplies.
There are three exits out of the room: the north door (made of wood), a western corridor, and a south corridor. The western corridor lets out into the garden at ground level by a shrine to the god Grund.
6. Alchemy
Behind a portcullis is the alchemy and enchanting room. This place is veritably stacked with tools and materials to create potions, enchanted items, and curatives.


Comments