A1 - Through the Storm: Arrival in Azurythos
Elevator Pitch
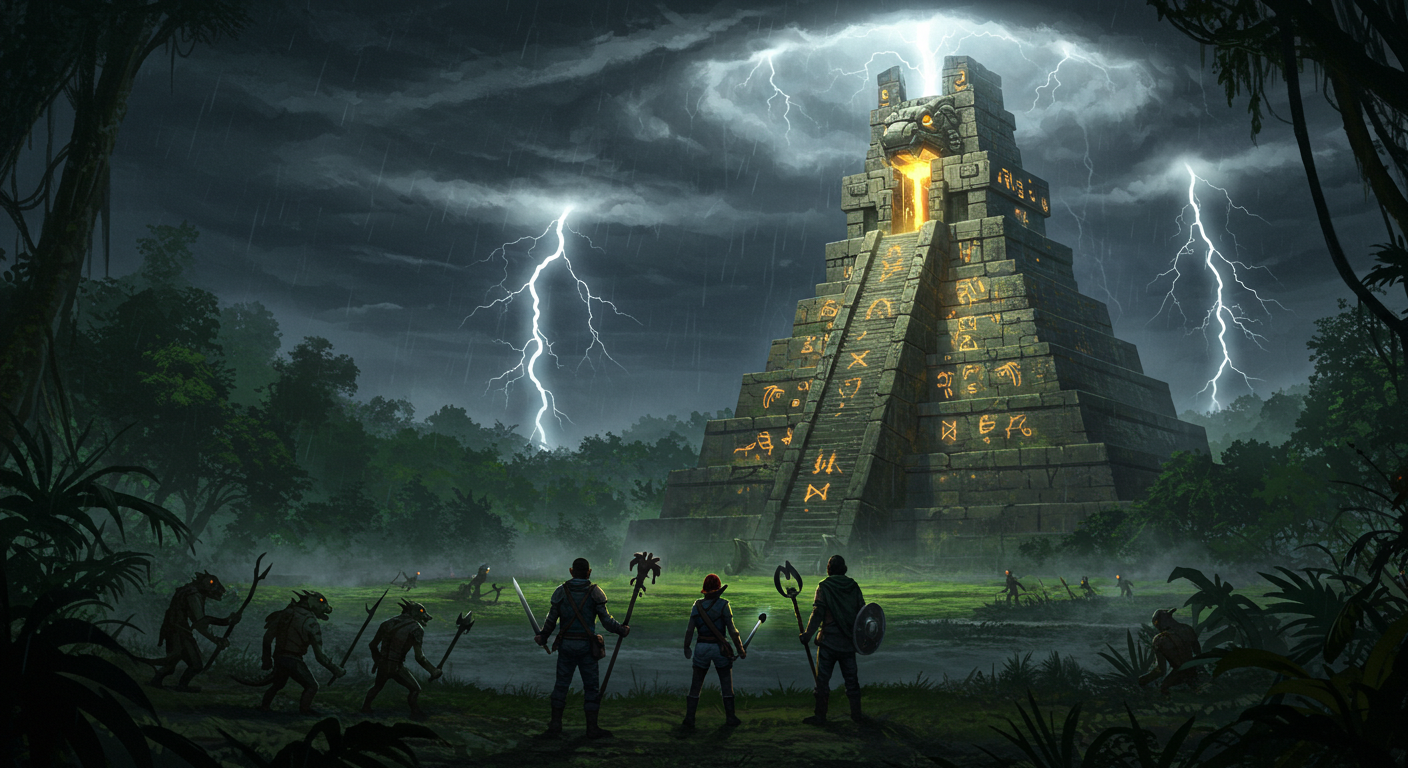
The PCs are swept into a mysterious new world during a violent storm atop El Castillo at Chichen Itza. Struggling to survive, they must navigate a strange temple, escape pursuing Kobalds, and find unexpected allies in a noble Gnoll warrior and his tribe. Their journey leads them to the fortified city of Kravyrak, where suspicion and distrust await.
Synopsis
The PCs, visiting El Castillo at Chichen Itza as tourists, are transported by a supernatural storm to a temple in the mysterious world of Azurythos. Inside, they discover the remains of a Dragonborn adventuring party and their starting gear. A hidden path leads to Bahamut’s slumber site, where cryptic hints of a greater danger and powerful rewards await those who discover it.
Upon leaving the temple, the PCs face an immediate survival challenge as Kobalds guarding the site pursue them southward. After navigating environmental hazards and escaping their pursuers, they encounter a Gnoll hunting party led by a noble warrior. This warrior guides them to a nomadic Gnoll encampment, where they regroup and gather information. From there, they journey to Kravyrak, braving random encounters and learning more about the world along the way. The adventure ends at the gates of Kravyrak, where they face distrust from the Dragonborn guards and must navigate the city to find their next steps.
Inciting Incident
While visiting El Castillo at Chichen Itza, a massive storm suddenly forms, unnaturally violent and filled with booming thunder. The PCs take shelter in the temple’s upper chamber as lightning strikes and the world turns white. They awaken in a similar but foreign structure, surrounded by Draconic symbols and artifacts.
Scenes and Events
Scene 1: The Storm and the White Flash
- Goal: Establish the PCs’ transport to Azurythos and their starting location.
- Location: The top of El Castillo, transitioning to a temple in Azurythos.
- NPCs/Creatures: None directly, as this is a scripted event.
- Information/Progression: The storm is sudden and supernatural, signaling the PCs’ journey to a new world.
Read Aloud:
The flight from the US to the heart of Mexico was dull, you saw some interesting animals as you drove through the jungle and now you climb the final stone steps of El Castillo, your breath steadying as the summit comes into view. The ancient temple looms before you, weathered but magnificent, its carved serpent motifs glinting faintly in the sunlight. The surrounding jungle stretches endlessly in every direction, a sea of green punctuated by distant ruins. Tourists murmur and snap photos, their voices blending with the rhythmic hum of cicadas.
As you approach the temple’s entrance, the air shifts—cooler, heavier. The wind picks up suddenly, rustling the treetops far below and sending stray leaves skittering across the stone platform. A low, rumbling growl rolls through the air, not unlike distant thunder, but deeper and more primal. You exchange uneasy glances just as the wind howls with a force that pulls at your clothes and hair.
Challenges and Mechanics
- Perception Check (DC 12):
- Success: The PCs notice the storm forming unusually quickly, with unnatural swirling patterns in the clouds. They realize something supernatural is occurring before it fully hits.
- Failure: The PCs are caught off guard by the storm's sudden ferocity.
- Insight Check (DC 15):
- Success: A PC notices the lightning strikes seem to align with the ancient carvings of El Castillo, suggesting the temple itself may be involved in the storm’s origin.
Skill Checks
- Athletics Check (DC 10):
- Success: A PC helps others into the temple just before the worst of the storm hits. No mechanical effect, but it builds narrative tension.
- Failure: A PC slips on the rain-slick steps, suffering 1 bludgeoning damage.
- Arcana Check (DC 14):
- Success: A PC senses that the storm is infused with magic, possibly linked to planar energy.
Potential NPC/Player Dialog
- NPC Tour Guide (Before the Storm):
- "This structure has stood for centuries, but I’ve never seen anything like this. It’s almost as if the gods themselves are angry!"
- PC Reactions to the Storm:
- "What the hell is happening?"
- "This isn’t natural—something’s wrong!"
- "Everyone inside, now!"
Read Aloud:
A deafening CRACK! splits the sky, and the ground trembles beneath your feet. Lightning arcs across the heavens in jagged veins, illuminating the temple’s intricate carvings in flashes of brilliance. The wind becomes a gale, pushing you toward the shelter of the temple’s shadow. As you turn to seek refuge, a final explosion of light engulfs you. The world dissolves into pure white, and then… silence.
Scene Outcome
- The PCs are disoriented but intact, ready to awaken in the Draconic temple. Any checks that failed create minor narrative setbacks, such as slips or delayed reactions, but do not impede the transition.
Next Scene: Waking up in the Draconic temple.
Scene 2: Awakening in the Temple
Goal: Allow the PCs to discover their starting gear, hints about the world, and the hidden lever leading to Bahamut’s chamber.
Location: A dimly lit Draconic temple with weathered walls and ancient carvings. The corpses of a Dragonborn adventuring team lie scattered in one corner, their gear intact but bloodied.
Read Aloud: Initial Exploration
When the PCs regain consciousness, read the following:
You awaken on cold stone, the scent of dust and age filling your nostrils. The air is heavy and still, save for the faint rustle of something unseen. Around you, walls rise, adorned with intricate carvings of serpentine creatures and coiling patterns, glowing faintly in the dim light. Across the chamber lies a tragic scene—a group of strange, reptilian beings, their lifeless forms sprawled amidst broken weapons and bloodstained armor. A faint, almost inaudible hum seems to emanate from the walls themselves.
Skill Challenges and Rewards
- Investigating the Room:
- Perception Check (DC 13):
- Success: The PCs notice faint scratch marks near the base of one wall and a loose stone nearby.
- Failure: The PCs don’t notice the marks but can still interact with the environment to find the lever.
- Arcana Check (DC 12):
- Success: A PC identifies the faint hum as latent magical energy, tied to Draconic runes carved into the walls.
- Examining the Corpses:
- Medicine Check (DC 14):
- Success: The PCs determine the Dragonborn were killed by slashing and piercing weapons, likely from humanoid attackers (hinting at Kobolds).
- Investigation Check (DC 10):
- Success: The PCs find functional starting gear among the Dragonborn’s belongings, appropriately tailored to the players’ classes.
- Treasure: A map fragment scrawled in Draconic (requires deciphering later).
The Hidden Lever
Read Aloud:
If the PCs find the lever: You brush aside a loose stone near the base of the wall, revealing a simple, worn lever tucked inside. The metal feels cool to the touch, clearly old but still functional. As you pull it, a deep rumble vibrates through the chamber. The wall beside you slides aside, revealing a narrow staircase spiraling downward into faint, golden light.
Trap (Optional): If you include a trap, use this mechanic:
- Dexterity Save (DC 12): If a PC pulls the lever too forcefully or doesn’t secure the stone afterward, a harmless puff of dust or a loud, clanging alarm fills the chamber.
- Success: The PC avoids embarrassment or startling the group.
- Failure: The noise echoes, unnerving the group but having no immediate consequence.
Dialog and Player Interaction
Encourage PCs to react and discuss their situation:
- Internal Reflections: “What happened to us? Where are we?”
- Questions About the Dragonborn: “What are these creatures? Were they guarding this place?”
- Speculation About the Lever: “Do we risk pulling this? It might be our only way out.”
Scene 3 (Optional): Bahamut’s Slumber Site
Goal: Reward exploration with cryptic hints about the larger world, thematic magic items, and a subtle mark of Bahamut’s blessing that sets the PCs apart without overpowering them.
Location: A radiant underground chamber suffused with divine energy, where Bahamut, the Platinum Dragon, slumbers.
Read Aloud: Discovering Bahamut’s Chamber
When the PCs descend the staircase, read the following:
The spiraling staircase descends deep into the earth, each step accompanied by a faint vibration that resonates through your bones. The dim golden glow intensifies with each step until you emerge into a cavernous chamber that feels like stepping into a legend. The walls are etched with intricate Draconic patterns that pulse softly, as if alive, and the ceiling disappears into a shimmering haze of golden light. At the chamber’s center lies a colossal dragon, its scales gleaming with a brilliance that seems to illuminate the air itself. Its immense body rises and falls with slow, deliberate breaths, and even in slumber, its presence fills the space with an overwhelming sense of awe and power.
Interacting with Bahamut
- If the PCs approach within 10 feet, Bahamut stirs, one glowing eye opening briefly. His gaze feels as though it pierces to your very soul.
Read Aloud: Bahamut Awakens
The dragon’s golden eye opens, its brilliance like a small sun fixed upon you. Though his body remains still, his voice resonates directly in your minds, deep and sonorous: “I am Bahamut, the Platinum Dragon, guardian of balance and light. Fate has drawn you here, though your purpose remains shrouded. Shadows rise, seeking to unmake what remains. Stand firm, for your steps will shape the destiny of this world… and your own.”
As his words echo in your mind, a faint golden glow washes over you. It lingers for a moment, warm and comforting, before fading into the still air. Bahamut’s eye closes once more, and the chamber dims slightly as his breathing slows, the ancient power withdrawing into silence.
Rewards
- Thematic Magic Items: Bahamut grants each PC a magical item tailored to their class:
- Fighter/Rogue/Barbarian/Monk: A radiant weapon or talisman, such as Sunlit Fang, a silvered blade or amulet that deals 1d6 radiant damage once per long rest.
- Wizard/Sorcerer: A shard of Bahamut’s scale, functioning as an arcane focus. Grants +1 to spell attack rolls and saving throw DCs for spells of 1st level or higher.
- Vitalist: Heartstone of Renewal, a glowing crystal that enhances healing. When you cast a healing spell, one target also gains temporary hit points equal to your Intelligence modifier.
- Bahamut’s Mark: The PCs receive a subtle blessing:
- Subtle Effects: A faint, golden shimmer in their eyes during moments of intensity. Observant creatures may perceive a soft radiance surrounding them in dim light.
- Social Influence: Creatures loyal to dragonkind sense the blessing. Kobolds and low-level Dragonborn feel an intangible connection to the PCs. High-level Dragonborn and dragons recognize the mark as Bahamut’s blessing, potentially aiding or hindering the PCs depending on their allegiance.
- Game Mechanics: PCs gain advantage on Persuasion or Insight checks with creatures loyal to Bahamut or dragonkind.
- Cryptic Knowledge:
- “The balance falters, and cracks spread in the barrier that shields this world.”
- “Seek the city of shields; there, your path may become clearer.”
Skill Challenges and Mechanics
- Perception or Investigation Check (DC 14):
- Success: The PCs notice the Draconic runes on the walls pulse faintly, forming protective wards.
- Failure: They sense an ambient magical presence but cannot discern its purpose.
- Arcana Check (DC 15):
- Success: A PC deduces the runes are binding Bahamut in a regenerative slumber to preserve his strength.
- Failure: The PC assumes the runes are only defensive.
Dialog and Player Interaction
Encourage player inquiries, using Bahamut’s responses to guide them:
- “What are you?” “I am Bahamut, guardian of balance and light.”
- “Why are we here?” “Fate has drawn you to this moment; the path ahead is yours to shape.”
- “What shadows rise?” “The answers lie beyond this chamber. Seek the city of shields.”
Exiting the Chamber
After receiving their rewards, the PCs ascend back to the temple. The chamber offers no immediate threats but leaves them with a sense of purpose and awe.
Read Aloud (Exit):
The golden light fades behind you as you ascend, the memory of the colossal dragon etched into your minds. Though the air grows cooler and the chamber above more mundane, the faint warmth of Bahamut’s blessing lingers, a silent promise of the trials to come.
After Scene 3, the PCs gain a milestone level-up to Level 2.
Scene 4: The Kobald Pursuit
Goal: Transition the PCs into survival mode as they fend off an initial Kobold attack and flee through the jungle. The encounter challenges their tactical thinking and encourages teamwork. By the end of the scene, the PCs should level up to 3.
Location: The dense jungle surrounding the temple.
Read Aloud: Initial Encounter
When the PCs exit the temple, read the following:
The humid jungle air is thick with the scent of damp earth and vegetation. The sunlight filters weakly through the dense canopy above, casting shifting patterns of light and shadow across the temple steps. As you descend, the sound of rustling leaves grows louder. Suddenly, sharp cries echo from the underbrush, and scaly figures emerge—small humanoid creatures with crude weapons, their yellow eyes gleaming with hostility. The Kobolds bark at each other in a guttural language before charging toward you, weapons raised.
Initial Encounter Mechanics
- Enemies:
- 6 Kobolds (CR 1/8 each): Equipped with slings and daggers.
- Start in cover, using ranged attacks for the first round before closing in for melee.
- Tactics:
- Kobolds use Pack Tactics to gain advantage on attacks when flanking.
- Two Kobolds attempt to circle around while four charge directly.
- If three or more Kobolds are defeated, the survivors retreat deeper into the jungle, initiating the chase.
- Skill Challenges:
- Perception Check (DC 12): Notice the Kobolds in the underbrush before they attack to avoid surprise.
- Survival Check (DC 14): Identify the signs of an ambush, granting the PCs advantage on their first attack roll.
The Chase
Read Aloud:
If the PCs pursue or move forward: The jungle becomes a chaotic blur as the Kobolds retreat, their shrill cries echoing through the underbrush. Roots and vines catch at your feet, and the shadows seem alive with movement. Suddenly, more Kobolds leap out from hiding, their snarls mixing with confusion as they seem to sense something unfamiliar about you. They hesitate for a heartbeat, then press the attack.
Chase Mechanics:
- Wave Encounters:
- Wave 1: 4 Kobolds ambush from the left flank.
- Wave 2: 5 Kobolds attack from above, using tree branches for height advantage (Perception Check DC 13 to spot).
- Wave 3: 6 Kobolds attempt a pincer maneuver, splitting into two groups.
- Total Kobolds: 15 (CR 1/8 each, 375 XP total).
- Environmental Hazards:
- Quicksand:
- Perception Check (DC 12): Spot the quicksand before stepping into it.
- Athletics Check (DC 12): Escape if caught.
- Strength Check (DC 10): Another PC can pull the stuck player free with assistance.
- Fallen Tree:
- Athletics or Acrobatics Check (DC 10): Leap over or clear the fallen tree. Failure results in slowed movement, risking another Kobold attack.
- Optional Combat Resolution:
- PCs can flee instead of fighting every wave:
- Group Stealth Check (DC 12): Avoid one wave by hiding.
- Athletics/Acrobatics Check (DC 14): Outpace one wave through clever movement.
XP Breakdown
- Initial Encounter: 6 Kobolds (150 XP total).
- Chase Waves: 15 Kobolds (375 XP total).
- Grand Total: 525 XP.
- Split evenly among 4 PCs = 131 XP each.
- Combined with prior scenes, this progression ensures the PCs reach Level 3 by the end of Scene 4.
Narrative Adjustments for Bahamut’s Mark
- Kobolds, though loyal to dragons, will attack initially, sensing the PCs’ trespass.
- As they close in, they become hesitant, their confusion apparent.
- Read Aloud for Kobold Reaction:
- During Wave 2 or 3:
- "The Kobolds snarl and rush forward, but as they get closer, their pace falters. Their eyes dart between you and each other, their snarls replaced by murmurs of confusion. Though clearly uneasy, they press the attack, their loyalty overriding their instincts."
Adjusting Difficulty
- If the encounter is too deadly:
- Introduce the Gnoll guide and his hunting party earlier (Scene 5).
- If the PCs struggle with multiple waves:
- Allow them to escape through skill checks, avoiding the final wave entirely.
- Scaling for Group Size:
- Add or remove Kobolds based on the party’s size and strength.
Scene 5: Rescued by the Gnoll Warrior
Goal: Introduce Balam Yax, establish him as a noble ally, and transition the PCs to safety in his nomadic Gnoll encampment.
Location: A dense jungle clearing near the Gnoll tribe's current camp.
Read Aloud: The Rescue
When the PCs are about to be overwhelmed by pursuing Kobolds, read the following:
The snarling cries of the Kobolds grow louder, their crude weapons glinting as they close in. Just as hope begins to fade, a deep, commanding voice booms from the shadows: "Hold your ground, you scaly vermin!" A tall, furred figure bursts into view, his powerful form clad in light leather armor adorned with beads and carved stones. Behind him, a group of similarly equipped warriors fans out, their bows and spears raised. The leader’s sharp, golden eyes lock on yours for a moment before he raises his spear high. “On me!” he commands, and his hunting party charges the Kobolds with practiced precision.
Combat Mechanics
- Gnoll Warriors (CR 1 each):
- 3 Gnoll warriors assist Balam Yax, driving off the Kobolds.
- Use pack tactics and ranged attacks to maximize efficiency.
- Balam Yax (CR 2 equivalent):
- Abilities:
- Spear of the Horizon: A magical spear attack dealing radiant damage against creatures loyal to darkness.
- Aura of Confidence (Passive): Allies within 10 feet gain +1 to attack rolls and saving throws.
- Tactics: Focuses on eliminating the most threatening Kobold to break their morale.
- Kobolds:
- 5 remaining Kobolds from the final wave of Scene 4. Visibly shaken by the arrival of the Gnolls.
Post-Combat Interaction
Once the Kobolds are defeated or driven off, Balam Yax addresses the PCs:
Read Aloud: Balam Yax Introduces Himself
The tall Gnoll steps forward, lowering his spear but keeping it ready. His piercing gaze sweeps over you, assessing, before he speaks in a low, resonant voice: "You are fortunate we were nearby. The jungle is no place for wanderers, especially ones who stand out as much as you." He glances at your gear, his brow furrowing slightly. "You carry yourselves like warriors, yet you are unlike any I have seen. I am Balam Yax, Claw of the Horizon, of the Xekar Tribe. Who are you, and what brings you to this land?"
Dialog and Interaction Options
- If the PCs mention Bahamut:
- Balam responds with curiosity and reverence, though he does not recognize the name directly.
- Dialogue Option: “A dragon of gold, you say? You bear his light—though faintly. Few speak of such beings in these lands.”
- If the PCs reveal they are from Earth:
- Balam is skeptical but does not dismiss them outright.
- Dialogue Option: “You speak of a far-off place, stranger than I can imagine. Whether truth or madness, time will reveal.”
- If the PCs express gratitude:
- Balam nods solemnly, his tone respectful.
- Dialogue Option: “It is the way of my tribe to aid those in need. But we must move swiftly. Danger lingers in these lands.”
- Persuasion Check (DC 12): If successful, Balam shares more about his tribe and their struggles. If the PCs succeed in persuading Balam Yax to share more about his tribe, he opens up cautiously, providing insights into the Xekar Tribe and their way of life. Read Aloud (if successful):
Balam Yax pauses, his golden eyes narrowing slightly as he studies you. "You seem sincere... perhaps it is fate that our paths have crossed. Very well, I will share what I can. But know this: my people value trust above all else. Betray it, and no force in this world will save you." He lowers his spear and leans on it, his tone softening as he continues.
Details About the Xekar Tribe
- What Balam Avoids Revealing
- He does not mention the full extent of the tribe’s knowledge about Yeenoghu’s corrupted Gnolls, as they are still investigating the phenomenon.
- He avoids discussing any internal conflicts within the tribe or dissent against Dragonborn dominance, as it is not yet relevant to the PCs.
Transition to the Encampment
Balam invites the PCs to follow him, explaining that his tribe is camped nearby. Along the way, he speaks of the dangers in the area and hints at Kravyrak’s location.
Read Aloud: Arrival at the Encampment
The jungle opens into a bustling clearing, where tents made of hide and sturdy branches form a temporary village. Fires crackle at the center, and Gnolls move with purpose—some tending to food, others sharpening weapons. Balam gestures toward the central fire. "Rest here. You are safe for now, but our journey is not yet over. Speak with me when you are ready, and I will guide you further."
Skill Challenges
- Insight Check (DC 13):
- Success: PCs sense Balam’s genuine nature and protective instincts.
- Failure: PCs remain unsure of his intentions, though he shows no hostility.
- Survival Check (DC 10):
- Balam leads the group efficiently, avoiding additional hazards and predators.
- Failure results in a minor delay (no mechanical penalty, just narrative).
Final Notes
- If the PCs engage deeply with Balam: They build trust, unlocking his full willingness to guide and protect them.
- If the PCs remain distrustful: Balam remains respectful but cautious, ensuring they reach the encampment safely.
Next Scene: The nomadic Gnoll encampment.
Scene 6: Rest at the Gnoll Encampment
Goal: Allow the PCs to recover, gather information, and prepare for the next leg of their journey. Introduce cultural insights into Gnoll society and hint at tensions between the nomadic tribes and Kravyrak.
Location: The nomadic Gnoll encampment, a temporary settlement nestled in a jungle clearing.
Read Aloud: Arrival at the Encampment
When the PCs arrive, describe the scene:
The dense jungle gives way to a lively clearing, where the sounds of crackling fires and muted conversation replace the rustle of leaves. Tents of sturdy hide and woven reeds form a scattered, temporary village. Gnolls move purposefully through the camp, some tending to their weapons while others prepare simple meals over open flames. Children dart between the tents, their high-pitched laughter a stark contrast to the solemn expressions of the warriors standing guard. At the camp’s center, a larger fire burns brightly, surrounded by roughly carved wooden benches. Balam gestures toward the fire, his voice calm but firm. “Rest here. My people are wary of strangers, but you are under my protection. Speak with me when you are ready, and I will guide you further.”
Scenes and Interactions
Rest and Recovery
- The PCs are offered food and drink by the tribe, simple but nourishing fare. This provides an opportunity to restore hit points and take a short rest.
- If a PC makes a Medicine Check (DC 10): They notice the Gnolls use jungle herbs for their remedies, which could be useful later.
Cultural Insights
If the PCs observe or ask questions about the tribe, Balam or other Gnolls provide the following details:
- Nomadic Lifestyle:
- "We move with the seasons, following the herds and the flow of the rivers. This land provides, but it demands respect. Those who take too much suffer its wrath."
- Rituals and Beliefs:
- A small altar near the edge of the camp is dedicated to the spirits of the land. A PC with high Wisdom or Nature proficiency may recognize it as a blend of animism and ancestral worship.
- Religion Check (DC 12): Reveals that the Gnolls believe their strength comes from their unity and their bond with the natural world.
- Tensions with Kravyrak:
- Balam hints at the strained relationship between the nomadic tribes and the city, saying: "The Dragonborn see themselves as rulers of this land. They call us savages, unfit for their walls. But we endure, as we always have."
Key Interactions and Skill Challenges
- Learning About Kravyrak:
- Persuasion Check (DC 12): If successful, Balam shares the location of Kravyrak and his reservations about its people:
- "The city lies to the south, a fortress of stone and pride. They guard the isthmus with walls and weapons, but their hearts are guarded just as fiercely. Do not expect a warm welcome."
- Failure results in Balam being more reserved, but he still offers to guide them.
- Insight Check (DC 10):
- Success reveals the mixed emotions in the camp. While most Gnolls respect Balam, there is unease about the growing dangers in the region.
- History Check (DC 15):
- Reveals parallels between the Gnolls’ culture and ancient Mesoamerican civilizations, including their use of ceremonial carvings and masks.
Potential Tension: Distrustful Gnolls
Some tribe members are openly wary of the PCs, particularly if they display any signs of arrogance or superiority.
- Intimidation Check (DC 12): If the PCs respond firmly but respectfully, the Gnolls back down.
- Charisma Saving Throw (DC 10): Failing this could escalate the tension, requiring intervention from Balam to calm the situation.
Clues and Mysteries
- Hints of Yeenoghu's Influence:
- Perception Check (DC 14): A PC notices a nearby Gnoll muttering about "the dark hunger." If questioned, the Gnoll mentions strange behavior among some tribes, with warriors disappearing only to return as feral shadows of themselves.
- Arcana Check (DC 15): Suggests a demonic influence.
- Exploring the Encampment:
- PCs can find simple supplies (e.g., basic weapons, rations) and observe the tribe’s way of life.
- A small carving near the altar depicts a fierce battle between Gnolls and a monstrous entity. Investigation Check (DC 13): Reveals that the entity resembles descriptions of Yeenoghu.
Moving Forward
When the PCs are ready to leave, Balam offers to guide them personally to Kravyrak.
Read Aloud:
Balam approaches, his expression calm but firm. "Our path lies south, through the jungles and across the savanna. Stay close, and heed my warnings—these lands are not forgiving to the unprepared. When we reach Kravyrak, you will see the pride of the Dragonborn. But tread carefully. Their kindness is as thin as their patience."
After Scene 6, the PCs gain a milestone level-up to Level 3 if they have not already reached it.
Next Scene: Journey to Kravyrak.
Scene 7: Journey to Kravyrak
Goal: Challenge the PCs with environmental hazards, random encounters, and opportunities to gather clues or treasures. Build tension as they approach Kravyrak, emphasizing the dangers and mysteries of the region.
Location: The jungles and savannas of southern Tharkalos, leading toward the Thalvyr Isthmus.
Read Aloud: Beginning the Journey
When the PCs set off with Balam Yax, read the following:
The dense jungle begins to thin as you travel south, the towering trees replaced by rolling savanna under an expansive, sunlit sky. The air is hot and dry, buzzing with the relentless hum of insects. Balam Yax leads confidently, his spear at the ready, his sharp eyes scanning every shadow and rustling bush. "The road to Kravyrak is not a road at all," he warns, his tone grim. "It is a path carved by the will to survive. Stay close, and heed my words."
Challenges and Encounters
- Environmental Challenges:
- Heat and Exhaustion:
- Constitution Saving Throw (DC 10): PCs must endure the intense heat.
- Success: PCs continue without issue.
- Failure: Gain one level of exhaustion (easily mitigated with a short rest in the shade).
- Navigating the Terrain:
- Survival Check (DC 12): Aid Balam in finding the safest route.
- Success: Avoid delays and minor hazards.
- Failure: PCs stumble into difficult terrain, losing time and gaining scratches and bruises (1d4 damage).
- Random Encounters: Roll a d6 once per in-game hour, or as narratively appropriate:
- 1–2: Wild Beasts – A pair of giant hyenas stalks the party.
- 3–4: Corrupted Gnolls – A small group of Gnoll Fangs of Yeenoghu ambushes the group.
- 5: Kobold Scouts – A trio of Kobolds tails the party, possibly leading to a larger group.
- 6: A quiet moment to admire the view of the Thalvyr Isthmus, a stark contrast to the perils of the jungle.
- Campsite and Researcher’s Letter:
- PCs discover the remains of a ruined campsite.
- Perception Check (DC 12): Spot a weathered journal addressed to "Archmage Zhorvynthas."
- Clue: Mentions a weakening barrier and spreading corruption.
- Treasure: A minor magical trinket (e.g., a charm of restoration).
Skill Challenges
- Stealth Check (DC 13): Avoid attracting predators or hostile creatures.
- Success: PCs bypass potential encounters.
- Failure: Trigger an encounter with hostile creatures.
- Perception Check (DC 14): Spot ambushes or hidden threats early.
- Success: Gain advantage on the next encounter’s initiative roll.
- Failure: The PCs are surprised.
- Insight Check (DC 12): Sense Balam Yax’s growing unease as they near Kravyrak.
- Success: PCs recognize his apprehension and can question him about tensions with the Dragonborn.
- Failure: They miss this subtle hint.
Goblin Encounter
Overview
As the party journeys toward Kravyrak, they encounter a small group of Goblins from a local tribe. This encounter can serve as an opportunity to highlight the Goblins’ complex cultural background, introduce moral choices, and provide subtle hints about their curse.
Read-Aloud Text: Spotting the Goblins
"As you press onward through the dense jungle, the undergrowth rustles ahead. You spot movement—small figures darting between the trees. Moments later, five Goblins emerge cautiously from the shadows, their patchwork clothing blending with the surroundings. They carry crude but functional weapons, and their wary eyes flick between you and the Gnoll guide. A few step back as if ready to flee, while the largest among them, a Goblin with a scar across his cheek, steps forward and raises a hand, palm outward, in what seems to be a non-threatening gesture."
Encounter Options
Initial Interaction:
- The Goblins are not immediately hostile. They’ve been forced to leave their home due to increasing pressure from Kobolds and are seeking safety for their small tribe.
- The scarred Goblin introduces himself as Dregk, Keeper of the Lost, and offers no aggression unless provoked.
Skill Challenges:
- Insight (DC 12): Determine that the Goblins are more desperate than threatening. Success reveals that their posture is defensive, not aggressive.
- Persuasion (DC 15): Convince the Goblins to share information about the nearby area, including dangers they’ve encountered.
- History (DC 13): Recall cultural details about Goblins and their history, recognizing them as cursed descendants of Elves.
- Survival (DC 10): Spot signs of recent Kobold activity near the Goblins’ path.
Dialogue Options
- Dregk (if approached diplomatically):
"We mean you no harm, travelers. Our home is lost, stolen by scaled thieves. What choice have we but to wander? You look strong… perhaps you’ve seen these Kobolds?" - Balam Yax (if addressing the Goblins):
"Stay your hands, Goblins. These travelers are no threat. Speak your purpose and leave us be, or face the consequences." - Dregk (if the PCs act hostile):
"Fools! We’re no prey for the likes of you. We may not have a home, but we fight to survive."
Combat Option
If the PCs provoke the Goblins, they fight defensively, focusing on survival rather than outright aggression. Use 5 Goblins (CR 1/4 each) and 1 Hobgoblin Leader (CR 1/2).
Tactics:
- The Goblins use their Nimble Escape to disengage and reposition, preferring ambush tactics.
- The Hobgoblin Leader coordinates attacks, using their Leadership ability to bolster the group.
Resolution and XP Awards
Peaceful Outcome:
If the PCs resolve the encounter without violence, they gain:
- 200 XP each for negotiating and diffusing the situation.
- Additional information about increased Kobold raids and the Goblins’ cryptic mention of their curse: "We wander, always searching, always fighting. Once, we were more. But the curse binds us still."
Combat Outcome:
If the PCs defeat the Goblins:
- Standard XP for the Goblins:
- 5 Goblins (CR 1/4): 50 XP each = 250 XP.
- 1 Hobgoblin Leader (CR 1/2): 100 XP.
Total = 350 XP divided among the party. - The party finds scraps of maps and notes that reference Kobold activity and a nearby Goblin settlement destroyed by recent raids.
- A token resembling an Elven artifact, hinting at the Goblins’ lost heritage.
Clues and Mysteries
- Hints of Yeenoghu’s Influence:
- Religion Check (DC 12): Learn that corrupted Gnolls are tied to demonic forces.
- Arcana Check (DC 15): Recognize signs of planar corruption, linked to the Abyss.
- The Researcher’s Letter:
- Provides cryptic hints about the barrier’s purpose and deterioration, deepening the mystery.
Treasure and XP
- Treasure:
- Crafting materials from wildlife encounters.
- Minor magical trinkets (e.g., ring of warmth, charm of restoration).
- XP:
- Encounters and challenges: PCs gain narrative XP if they engage meaningfully with the environment, leading seamlessly into their Level 3 milestone after Scene 6.
Next Scene: Arrival at Kravyrak.
Scene 8: Arrival at Kravyrak
Goal: Conclude the adventure by introducing Kravyrak, emphasizing its fortified splendor and the inherent tensions within. Set the stage for the PCs to explore the city and begin the next phase of the campaign.
Read Aloud: First Glimpse of Kravyrak
The savanna opens to reveal a sight unlike any you’ve seen before: the towering walls of Kravyrak, rising like jagged shields against the horizon. The star-shaped fortifications gleam with polished stone and iron, their sharp angles designed to repel invaders. Massive gates, reinforced with gleaming metal, stand as the only visible entry point. Dragonborn guards patrol the ramparts, their golden scales catching the sunlight, while banners bearing the emblem of the Shielded Scale flutter in the breeze. The hum of distant activity drifts from the city, but at this distance, Kravyrak seems as much fortress as settlement—a bastion of power and pride.
History Check: Recognizing the Starfort Design
As the PCs approach the city, their familiarity with its unique architectural style sparks a connection.
Skill Check: History (DC 13)
Prompt:
The sharp, angular design of the walls stirs a flicker of recognition in your mind, their imposing geometry reminiscent of something you’ve seen before.
On a Success:
You study the fortifications more closely, their sharp angles and layered design strikingly similar to the starforts of Earth’s Age of Gunpowder. These forts were built to repel cannon fire and siege weapons, emphasizing strength and efficiency. Here, the purpose must be different, but the resemblance is uncanny. The sight fills you with a sense of connection between your world and this one, as though the two share a history long forgotten.
On a Failure:
The star-shaped walls remain a mystery, their intricate angles and imposing presence a testament to the skill of their creators. Whatever their purpose, they clearly stand as a warning to would-be invaders.
Challenges and Mechanics
- Persuasion/Deception Check (DC 15): Convince the guards of your harmless intentions or fabricate a plausible reason for entry.
- Success: The guards grudgingly allow you inside but warn you to stay out of trouble.
- Dialogue Option: "We’ll allow you entry… for now. But be warned—any disruption, and you’ll answer to us."
- Failure: The guards remain hostile, requiring additional attempts or intervention from Balam Yax.
- Balam Yax’s Defense:
- If the PCs falter, Balam steps forward, addressing the guards in a firm yet measured tone.
- Dialogue Option (Balam): "These travelers are under my protection. They pose no threat to your city. Surely the Shielded Scales can show hospitality to those in need."
- Insight Check (DC 12): PCs can discern that Balam’s presence barely tips the scales in their favor.
Read Aloud: Entering Kravyrak
The gates creak open, revealing a city alive with motion. Crowded streets are lined with market stalls, the air thick with the scent of spices and the clang of hammer on steel. Dragonborn citizens move purposefully, their polished armor and robes marking them as the city’s elite. Gnolls, humans, and other species weave through the crowds, their more modest attire and wary gazes betraying their lower status. Above it all, the star-shaped walls loom, a constant reminder of the city’s unyielding power.
Opportunities for Interaction
- Exploring Kravyrak:
- PCs can interact with merchants, explore the Artisan District, or observe the stark contrasts between the Dragonborn Estates and the Gnoll Enclave.
- Adventurers’ Guild:
- A potential hook for the next adventure. The guildmaster expresses interest in the PCs’ strange attire and offers work.
- The Shielded Scale Emblem:
- PCs bearing Bahamut’s mark draw subtle attention from Dragonborn who recognize its significance.
- History Check (DC 14): Reveals that the mark is a symbol of divine favor, though its exact meaning is debated.
- Seeking Archmage Zhorvynthas:
- If the PCs discovered the researcher’s letter, they can inquire about the Archmage.
- Investigation Check (DC 13): Asking around leads them to Zhorvynthas’s tower, a spiraling structure of black and gold stone in the city’s eastern quarter.
- Reaction of NPCs: Those who know the Archmage regard him with a mix of awe and trepidation, describing him as one of the most powerful wizards in Valkyrath.
- Meeting Zhorvynthas could offer insight into the barrier and the mysteries surrounding it, depending on the PCs’ approach.
- Balam Yax’s Struggles:
- Balam’s treatment by the guards and citizens highlights the city’s prejudice against Gnolls, setting up future narrative conflicts.
Challenges and Skill Checks
- Perception Check (DC 12): Spot a pickpocket trailing the PCs.
- Success: The PCs catch the thief in the act.
- Failure: The thief escapes with a minor item (e.g., a coin pouch or trinket).
- Investigation Check (DC 10): Learn about city landmarks, such as the adventurers’ guild or notable markets.
- Insight Check (DC 15): Discern undercurrents of tension among the city’s lower classes, hinting at potential unrest.
Ending the Scene
This scene transitions the PCs into Kravyrak, introducing key elements of the city and hooks for future adventures. Whether the PCs explore the Adventurers’ Guild, seek out Zhorvynthas, or delve into the city’s cultural complexities, they are now equipped to make meaningful choices in the campaign.
Read Aloud: A New Chapter
As you take your first steps into the City of Shields, the weight of its imposing walls presses down on you. This is a place of opportunity and danger, where allies and enemies are made with equal ease. Balam Yax’s voice cuts through the din. "This is Kravyrak," he says quietly. "May your stay here bring answers… and not more questions."

Comments